
Saturday, 15 December 2018
Around the globe
Today I am showing an inspiration make for Crafts U Love. With the Christmas cards made and sent, for the most part, time to think about the New Year.

Sunday, 9 December 2018
A little work
Little indeed... way too small to cram much into it, but on the upside small enough to be made in an afternoon and just make the deadline for the Paper Artsy Matchbox challenge!

The outside of the box has been stamped with JM06 and embossed in Wow embossing powder in Perissa, a gorgeous rose gold.
The box itself has been prepared with a coat of PA Fresco paint, then stamped with MN30 (small hand script) and the branch from HP1008 stamp set.

I added mica flakes and microbeads at the bottom, as a sort of ground for my Paper Doll, and if you look closely you'll see the glue hasn't even dried yet!
A few die-cut stars with gold mica powder and voila, set and matchbox!
Thanks for coming by,
 I am also entering the SSS Monday Challenge (my B is for Box), SSS Wednesday Challenge, Creative Artiste, Vintage Journey and That's crafty challenges.
Friday, 7 December 2018
Going bold for Christmas
Hello faithful followers and crafters, Time for our December Stamplorations Theme and Sketch challenge.


Wednesday, 5 December 2018
Let it snow Christmas tree and night sky
If you are coming from Country View Challenges blog, you've come to the right place for my second inspiration make on the Christmas theme.

Distress Inks and torn scraps of paper created the sky and the hills.
The fir tree stamp is from Crafty Individuals and the Let it Snow sentiment has been die-cut from glitter paper with a CUT-ploration die.
I added falling snow with white acrylic paint through MFT Snowfall stencil.
I hope you like my brightly coloured Christmas card and you will join us at Country View Challenges for the chance to win a £20 voucher.
Thanks for coming by,
I am entering the Lost Coast Designs, The Artistic Stamper, Stamping Sensations, That's Crafty, Addicted to stamps challenges.
Saturday, 1 December 2018
Xmas Village in the wood
Can you believe Christmas is less than a month away!! But there it is, and it's no coincidence we have chosen Christmas as our theme for this month's Country View Challenge!

I am trying to use up some old supplies in an effort to streamline my stash (yes, as if that's going to do it!) and pulled out this positively ancient sheet of peel offs with Christmas images. I remember buying it as I loved the image but, when it came to it, I had no idea how to make it look nice.
Taking the bull by the horns, I placed the line design on a piece of painted card, a mix of Fresco paints and Infusions. I coloured the robin with pencils to make it pop and some other touches here and there to give the design a bit more life.
For my background, I created a panel with Sizzix Tim Holtz Alterations 3-D Embossing Folder - Lumber and Distress Oxides (Walnut and Antique Linen).
I created an embellishment by adding white Graphmaster acrylic paint pen on a pine branch die-cuts (Impression Obsession) before applying glue and a generous sprinkle of white flock plus a tiny amount of white glitter a on top. Some die cut berries (I believe a Memory Box die) from vellum pass as mistletoe berries.
I hope you like my nature inspired Christmas card and you will join us at Country View Challenges for the chance to win a £20 voucher.
Thanks for coming by,
I am entering the SSS Wednesday, and That's Crafty challenges.
Friday, 30 November 2018
Mere baubles

I can't believe December is upon us! All the Christmas preparations I have still to make... With less time on my hands, I am now making simpler cards and today I am showing one with the same Studio Light Basics Clear Stamp And Die Set - No.17 I used on my Shaker Spinner card earlier this month.
Wednesday, 28 November 2018
Blue snowflakes start falling
A quick post to show a Christmas card (I'm on a roll...) with a cute Vintage image.


Friday, 16 November 2018
Over the rainbow
Still 2 weeks to enter our Stamplorations Theme & Sketch Challenge and here I am with a second inspiration make.
This month the theme and sketch are:
This month the theme and sketch are:


Thursday, 15 November 2018
Shaker Spinner card
For us crafters there's a time for mass production of Christmas cards and then they are one of a kind, time consuming cards designed to stand out on the mantelpiece.
Today's offering is one of those...

It has a shaker element AND a spinner element for that wow factor and the sentiment is revealed by the spinner arm when opening the card, with both outside and inside in play, there are lots of layers and lots of opportunity for embellishments...

To make the spinner mechanism I'll refer you to Karen Burniston herself and this video: https://www.youtube.com/watch?v=lhDIOvEK3k0.
The papers I used to create mats for the card blank and make all the embellishments are from Echo Park, the sentiment and small poinsettia have been stamped with the John Next Door Clear Stamp Set - Poinsettia.
The main embellishments have been stamped, embossed in gold Wow EP and die-cut with a new set by Studio Light, Studio Light Basics Clear Stamp And Die Set - No.17, which has both baubles stamps and matching dies. No fussy cutting, sigh of relief...
I wanted to emulate that shiny but "frosted" look of the baubles I remember from my childhood and applied a wash of Cosmic Shimmer Pixie Powder in White Pearl to the offcuts of Echo Park paper. With hindsight a coloured version would have produced a closer effect but it looked good anyway.

And ooh, look at the waste, could I use that as a topper or even a stencil?
I made the tree embellishment using an old technique with the Echo park paper.
I cut a half circle from double sided patterned paper - it doesn't need to be green on both sides, contrasting colours work too - and folded 4 times alternating mountain and valley folds.
Each segment should be progressively larger and they all start at the same point about 1/3 along the straight edge.
 Feel free to enhance the shape by using a scalloped, pinked or other elaborate circle die or decorative scissors.
To glue my tree together and give more dimension I used increasingly thicker foam pads for each fold.
 There are also 2 foam pads on the other side.
To decorate the tree there are lots of options: create baubles with Nuvo drops or gems, garlands with glitter glue, embossing pen and powders, gel pen etc...

To make the shaker element I cut a frame from glitter card and one from cardboard instead of using dimensionals all around the frame as it is really thin. I also cut 2 pieces of acetate to sandwich my confettis.
 With the glitter frame glued to the cardboard and one of acetate square, the bottom acetate square in place, I poured some of the confetti in the middle, before applying glue to the back of the frame and sticking over the aperture. If like me you used wet glue don't disturb the card until the glue is totally dry, otherwise some of the confetti will get stuck!
Supplies:
Echo Park Christmas Gingham 6" x 6" Paper Pad
Studio Light Basics Clear Stamp And Die Set - No.17
Karen Burniston Spinner Square Pop-Up Die Set
John Next Door Clear Stamp Set - Poinsettia
Tonic Studios Nuvo Confetti - Desert Sunset Stars
Cosmic Shimmer Pixie Powder - White Pearl
JEJE Double Sided Foam Squares - 1mm
JEJE Double Sided Foam Squares - 2mm
JEJE Double Sided Foam Squares - 3mm
WOW! Embossing Powder - Metallic Gold Rich
You were warned, quite a lot involved... but you can take from this anything you like!
I will leave you with a last photo of the card, opened flat:

Thanks for coming by,
I am entering the Addicted to Stamps, Allsorts, Stamping Sensations, Vintage Journey, SSS Wednesday and Crafty Cardmakers challenges.
Today's offering is one of those...

It has a shaker element AND a spinner element for that wow factor and the sentiment is revealed by the spinner arm when opening the card, with both outside and inside in play, there are lots of layers and lots of opportunity for embellishments...

To make the spinner mechanism I'll refer you to Karen Burniston herself and this video: https://www.youtube.com/watch?v=lhDIOvEK3k0.
The papers I used to create mats for the card blank and make all the embellishments are from Echo Park, the sentiment and small poinsettia have been stamped with the John Next Door Clear Stamp Set - Poinsettia.

The main embellishments have been stamped, embossed in gold Wow EP and die-cut with a new set by Studio Light, Studio Light Basics Clear Stamp And Die Set - No.17, which has both baubles stamps and matching dies. No fussy cutting, sigh of relief...
I wanted to emulate that shiny but "frosted" look of the baubles I remember from my childhood and applied a wash of Cosmic Shimmer Pixie Powder in White Pearl to the offcuts of Echo Park paper. With hindsight a coloured version would have produced a closer effect but it looked good anyway.

And ooh, look at the waste, could I use that as a topper or even a stencil?
I made the tree embellishment using an old technique with the Echo park paper.
I cut a half circle from double sided patterned paper - it doesn't need to be green on both sides, contrasting colours work too - and folded 4 times alternating mountain and valley folds.
Each segment should be progressively larger and they all start at the same point about 1/3 along the straight edge.
 Feel free to enhance the shape by using a scalloped, pinked or other elaborate circle die or decorative scissors.
 To glue my tree together and give more dimension I used increasingly thicker foam pads for each fold.
 There are also 2 foam pads on the other side.
To decorate the tree there are lots of options: create baubles with Nuvo drops or gems, garlands with glitter glue, embossing pen and powders, gel pen etc...

To make the shaker element I cut a frame from glitter card and one from cardboard instead of using dimensionals all around the frame as it is really thin. I also cut 2 pieces of acetate to sandwich my confettis.

Supplies:
Echo Park Christmas Gingham 6" x 6" Paper Pad
Studio Light Basics Clear Stamp And Die Set - No.17
Karen Burniston Spinner Square Pop-Up Die Set
John Next Door Clear Stamp Set - Poinsettia
Tonic Studios Nuvo Confetti - Desert Sunset Stars
Cosmic Shimmer Pixie Powder - White Pearl
JEJE Double Sided Foam Squares - 1mm
JEJE Double Sided Foam Squares - 2mm
JEJE Double Sided Foam Squares - 3mm
WOW! Embossing Powder - Metallic Gold Rich
You were warned, quite a lot involved... but you can take from this anything you like!
I will leave you with a last photo of the card, opened flat:

Should you purchase any of the products I have used on this card, select 'Design Team' in the 'where have you seen us' drop down so we know we have inspired you!
Thanks for coming by,
I am entering the Addicted to Stamps, Allsorts, Stamping Sensations, Vintage Journey, SSS Wednesday and Crafty Cardmakers challenges.
Monday, 5 November 2018
ATC Coins - Serious Birds
For my second inspiration piece for the Country View Challenge on the theme of AT Coins, chosen by Debs, I have chosen to keep with the bird them. If you missed the first set, my "funny" birds you can find them here).
I find my "serious" birds equally funny and I hope they will make you smile too!

For my background I used a Gelli Printed tissue paper made with Paper Artsy Fresco paints and the Random Circles stencil by Tando Creative. Tissue paper is great with Gelli printing because being thin the paper can be pressed to pick all the paint up off the Gelli plate and it acquires a sturdiness in the process that renders it easier to use in projects.
The birds are from the Lost Coast Designs Big Anthropomorph Birds set and have been stamped with black Memento ink.
Unused as I am to this small size, I quite like the result and the AT Coins were, after a long time spent scratching my head, very quick to make.
Thanks for coming by,
I am entering the Paper Artsy, SSS Wednesday, Penny Black and more and Craft Stamper TIMI challenges.
Friday, 2 November 2018
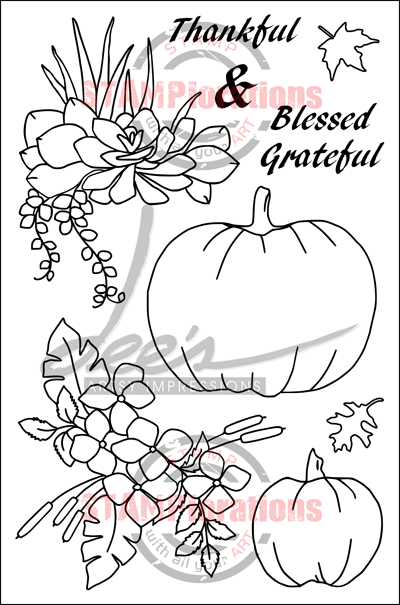
Thankful
Welcome to a new Stamplorations Theme & Sketch Challenge! Our theme and sketch are:

I created a panel with Prima Blooms sprays and stamped one of the flower clusters with Memento Fog grey, which I coloured with watercolour pencils and a water brush. The sentiment stamped with black Versafine is from the same set.
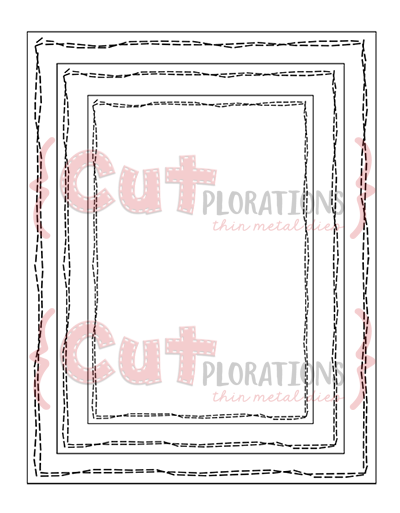
I die-cut the panel with my ever useful Crazy Double Running Stitch Rectangle Nesting Dies and layered it on a piece of printed vellum.
You'll find more inspiration from my teamies along with the linky for your entries to the challenge on the STAMPlorations blog and all the prize details... did I mention there are prizes?!! All the more reasons to play with us!
Whenever you shop for STAMPlorations products you can get 20% off with my code: STAMPGIRLCRAFTY
Thanks for coming by,
I am entering the Addicted to stamps and SSS Wednesday challenges.
Thursday, 1 November 2018
ATC Coins - Funny birds
Welcome to my first inspiration piece for our Country View Challenge hosted by the lovely Debs. She has chosen Artist Trading Coins as the theme (AT Coins are 2.5" diameter circles).

I used a piece of paper I had used with Prima Bloom sprays and the Tando Creative Leaves masks for my background.
The small birds are from the Birds of Paradise STAMPlorations stamp set and the cute ostrich head is from Katzelkraft (Ostrich - SOLO088). I coloured all the images with water based pens.
To take the photo I placed the ATCs on a piece of card I coloured with Distress Oxide inks applied in overlapping streaks. I thought it funny the way the Birds of Paradise are looking up at the Ostrich, either with envy or alarm!
Now it's over to you and I can't wait to see what you make... Remember that if you enter our Country View Challenge, you could win a £20 voucher to spend on new crafty supplies, so don't wait up!
Thanks for coming by,
I am entering the Addicted to Stamps, and SSS Wednesday challenges.
Subscribe to:
Posts (Atom)