' ' ' 'Crafty Endeavours: June 2016

Tuesday 28 June 2016

Dog under the sea

And the award for the most bizarre challenge theme goes to...

the    Craft Barn

Yes Dog under the sea is the challenge this fortnight and obviously not an easy one!
Thankfully my mind wandered from dog to cat and catfish and I thought "dogfish... do I remember dogfish or am I making this up?" A quick Google later and I knew what I was going to do!


I have seen this technique a long time ago but had never tried it so this was my chance! On top of the picture (printed from an online pic of a real dogfish) I placed a small grip seal bag (Ziploc bag) filled in with transparent hair gel and a drop of Distress reinker.

I created a wooden panel using acrylic medium and Infusions (Paper Artsy) on base of thick cardboard and cut out the aperture.
I stamped the "Scale" from the Hot Pick 1201 (Paper Artsy) and added a shrink plastic tag with the Anchor from the same set, stamped in silver.

And in the end, I'm quite pleased with the theme as otherwise I wouldn't have tackled those 2 techniques on my list! You might think my dogfish a bit of a cop out but... I say fair cop!!!

Thursday 23 June 2016

Fabric bag make

The Paper Artsy challenge this fortnight has a Fabric theme and I've felt compelled to make my own bag. Well, I say made, I added a pocket, but sewing is not my forte so this is quite a feat for me!
But Darcy (see her pencil wallet here) and Deb (see her phone case here) gave me the push I needed to tackle this long awaited project.

Those not living in the UK may not know that, late last year, a new law came into effect prohibiting shops to give out plastic bags free of charge. As a result, some gave out alternatives.
I got this fabric bag, and yes if you look closely, you can tell which shop I got it from, in December when the slogan printed on one side of the bag was both suitable and fun. Now....not so much
 So, in order to hide it I created a panel to sew on as a pocket, giving me an extra carrying option, as a bonus.


I used 2 stencils (Andy Skinner for DecoArt) and paint as a first layer on a recycled piece of burgundy canvas.
I stamped the houses from the LPC012 set by from Paper Artsy on tissue paper and painted it on the back in violet before sticking it to the canvas with gel medium.

Looking at it now I'm not sure the overall effect is a good one but I can live with it and shop with it!

I won't keep you in suspense any longer, so let's take a look at the completed bag:


And just so you know, dear readers, you have been spared all the gory details of what went wrong during the sewing as this post would have rivalled War and Peace and who has time for that!

I am also entering the We Love To Create challenge

Saturday 18 June 2016

Dictionary Challenge K

After my late entry last time I made sure I was in the starting blocks this time for the Craft Barn Dictionary Challenge...

The letter is K, no twist, and at first I was concerned I wouldn't find anything suitable. I looked through my stamp collection trying out K words on them and happened on this charming Crafty Individuals image. OK, so I chose the familiar Kid rather than Child but it's in the dictionary, and all is fair in Dictionary challenge and crafting...


I stamped the CI-449 stamp with black Versafine and stamped again on a separate piece of paper to create a mask.
I placed the mask over the image and used a Dutch Dobadoo stencil with pink and blue Distress inks to give my children a background.

I coloured the stamped image with pencils (the boy does have a light green tee-shirt).
As usual, I added the definition and, this time, I thought it would be fun to stamp my letter right on the tee-shirt of the little boy.
I'm really pleased with that one, although I can't really take the credit since it's pretty much all down to the lovely stamp.

Thanks for coming by,
I am also entering the Stamplorations CAS and That's Crafty challenges

Friday 17 June 2016

Crackled wood panel

Time for my second Crackle inspiration piece for the Country View Challenges blog. Last time I eased you in with a quick and foolproof method (see here), this time I am taking the more traditional approach with a 3 steps crackle.


First a coat of acrylic paint in the colour you want your crackles to be (in my case black), second the crackle medium (today I have used Imagination Crafts) and third your desired top coat colour of acrylic paint (a mix of several Fresco paints by Paper Artsy).

To add a bit more of a distressed look I also added some light grey paint patches and Vaseline in a few places (sparingly). When dry I then removed the paint that didn't stick to the Vaseline with a soft cloth.

Notes: 1) With this medium, the direction of the brush when applying the top coat, decides of the direction the crackles will take. You can see on the photo that used both vertical and horizontal brushstrokes.
2) The crackling happens as soon as the top coat touches the Crackle Medium layer, and there can't be any hesitation, only put the brush down once on any particular area! If mixing colours make sure you have enough before you start (ask me how I know...).


For my focal image I unearthed a very old stamp by Joanna Sheen and as I wanted a Vintage feel I started with Versafine Sepia. But the image lacked strength so I inked first with Versafine then added black on one side then softened by tapping the Sepia inkpad until I had a smooth colour transition.

You can see that doing this DOES contaminate my inkpad but it's actually a bonus for me as I'm just as likely to need a darker brown next time and it's already there waiting for me. It does eventually disappear if you keep inking from that side.

For embellishments and mats I searched through my scraps and picked remnants of masterboard, patterned paper and die-cut metal. I added a piece of cream muslin and a length of natural twine.

Finally to frame my image,  I painted a Tando chipboard piece in red and applied tinted Grunge paste through a Prima Doily Stencil. When dry I rubbed Treasure Gold in Onyxite and White fire.


There you have it... I do hope I have inspired you to join us for our Crackle challenge and would love to know what you think of my board.
Have a great weekend,
I am entering the We Love To Create, Sandy & Amelie Steampunk, The Artistic Stamper and the Stamplorations Mixed Media challenges

Sunday 12 June 2016

Travel

Time for the latest instalment of the Craft Barn dictionary challenge. Our chosen word needs to start with a T but no twist this time. The most difficult was to choose between the many options I had.... You could have had Trees (I could make a forest with all the Tree stamps I have) or Train but in the end Travel won...

I first stamped the Venetian bridge image (Travel sheet by Rubber Dance) and masked it before stamping the map and Eiffel Tower as well as the word Travel, all from the same stamp sheet.
For colours I used Turquoise Brusho  and Violet Storms Infusion on the Venetian image and Distress inks around it.

Thanks for coming by,
I am also entering the Craft STamper challenge.

Saturday 11 June 2016

House and Gardens

Paper Arsty's blog theme is Houses this fortnight and we've been treated to House makes in all kind of materials and even in 3D!
Wanting to join the challenge, but without getting involved in paper engineering, I chose to create a whimsical house and garden not unlike that drawn by children.

My base is thick white cardstock prepared with Gesso.
I stamped with black dye ink all the elements, masking the house. The house is an old set by Polkadoodles (Gazebo Neighbours)and the flowers are from the Paper Artsy EKC02 set.
I coloured sky and grass with Gelatos, flowers with gel pens in iridescent colours (difficult to see in the picture but they do shine in a certain light...) and the house and bench with watercolour pencils.

Thanks for coming by,
I am also entering the SSS Monday Challenge challenge.

Friday 10 June 2016

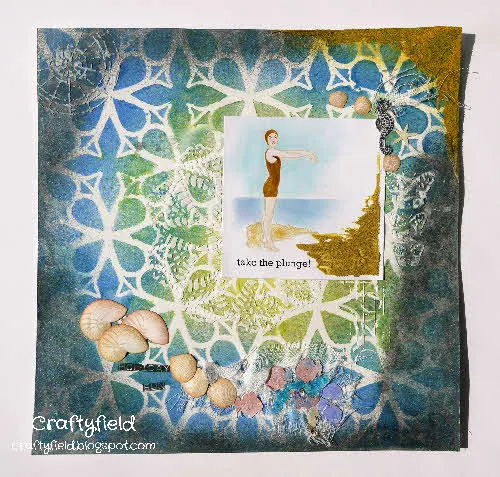
Beach Layout

I was the lucky winner of the March Vintage Journey challenge and I was invited to Guest Design.
The theme for this month's challenge, hosted by Astrid, is Embossing Pastes/Textures, a must have for Mixed Media work, and this is what I am showing today.

Hoping for warmer weather, I selected bright colours and let go the Vintage tones entirely, taking inspiration from beach colours for a holiday scrapbook page. The photo I have included is not actually the photo but a place holder I had great fun to design.


For the background I used sprays and Grunge paste with several stencils on my watercolour paper base.
As a feature I created a sandy beach on my "photo" and also in the top left corner with heavy gel medium, a touch of yellow acrylic paint and sand of course!

To make my fake photo I stamped the lady in Versafine on glossy paper (from the Take the plunge set by Rubber Dance) and coloured with Distress inks.

Finally I used some paste as a 3D glue to give my shells a more realistic shape.
To make them I first stamped them (all shells, starfish and seahorse are from the Rubber Dance Retro Beach set ), then fussy cut. I applied a bit of colour with Distress inks and shaped then with a ball tool, giving them a curve. The gel medium helps in supporting the curve as well as keeping the shells stuck!
I added a few sea creatures confetti (painted with gesso to dampen the garish colours), muslin, and micro beads.
Under this angle the sun catches the mica for maximum shine!


You can visit A Vintage Journey for more pictures.
Also entering the Our Creative Corner, Love to Create and That's Crafty challenges

Wednesday 8 June 2016

Sand dunes and salty air

I love the month of June for its promises of summer holidays coming soon... and I'm already dreaming of beaches, sun and sand! I am listening to Groove Armada whilst I am writing this to match my mood.

I hope you are up for some seaside fun! Today I am proud to be guesting on the Rubber Dance blog with an ATB made up with stamps of a single set, the Retro Beach that I totally love.


With six sides, plenty of chances to get inky... and almost enough surface to show off all the stamps in the Rubber Dance Retro Beach plate. In fact I only left out one stamp! Pop over to the Rubber Dance blog to see more pictures (and all 6 sides).
But if you are interested on how I put together the Calico Craft cube, stay on a little longer as I have  more details below.

This is an Artist Trading Block (ATB) from Calico Crafts, their medium size, measuring 3 cubic inches (7.5cm³).

As you see from the pictures the "instructions" are burned into it, literally and it's all self explanatory. Place the "bottom" at the center and align all  the other pieces according to the letters shown. The "top" piece can be slotted in upwards or downwards.

Applying the glue requires a bit more thought as it needs to be applied alternatively on the top and side grooves, as this photo shows:

I used Heavy Gel medium for glue but I didn't glue the "top" part in case I want to put something in the cube later. Maybe some grains of sands, seashells....

Other supplies:
Brushos: Ultra-marine, Turquoise, Brown, Moss Green
Infusions: Violet Storms, Golden Sands
Inks: Versafine, Versacraft
Watercolour paper; Heavy Gel medium, Mod Podge and DecoArt Ultra Matte varnish

Are you looking forward to a beach holiday?


My ATB is entering the Craft Stamper, That's Crafty, Fashionable Stamping and Allsorts challenges.

Tuesday 7 June 2016

Lest I forget...


Father's day is getting closer fast and I haven't got anything suitable in my reserve... Plenty of choice for girls, but boys...

I chose to ink up this elephant image from Rubber Dance and inspired by its designer (see Susanne's make here) I watercoloured it with the same pens I used to ink the stamp  (Zig Art Graphic).

I jumped on the opportunity to use some of my old stock of papers and used a piece of corrugated cardstock and a snippet of designer paper (Hot Off The Press).

The cards sketch has been provided by Stamplorations, although I flipped it, courtesy of a cutting accident!

Thanks for coming by,
Also entering the Uniko, Stamplorations CAS, Polka Doodle, and Stamping Sensations  challenges.

Saturday 4 June 2016

Cas Blue

Creatively speaking I am all on a summer vibe... Today I painted some Frangipani flowers, love their smell and for me it's the scent of a beach holiday!

OK, so they're not true to life, what with being blue, but in my defence it's the colour for the Stamploration challenge!


The stamps are from the Plumerias set (Inspired By Stamping). I inked them with Distress ink to attempt a no line colouring, using watercolours. The solo flower is stamped with dye ink to get it to pop. I also stamped it twice using a mask (hand cut) to extend the flowering branch.

I added some leaves die-cut from blue cardstock (Tender Leaves by Memory Box). Again, not true to life, but Artistic license and all that...

As to the no line watercolouring I'm quite pleased with the result but the design doesn't really gel and I'm afraid I gave up on it after pushing paper around for what felt like hours.

I'll do better next time, promised!
Also entering the Casology, SSS Monday, SSS Wednesday and the Memory Box challenges.

Wednesday 1 June 2016

Crackle for the terrified

First day of the month...it's time for another challenge at Country View and the theme chosen by Evelyn is Crackle.
To ease in those terrified by the real crackle, I picked an easy, no fuss, no mess method of getting crackle on projects!


The way to get perfect crackle every time... use a stamp and fake it! Plenty of brands have made crackle stamps, here I used one by Crafty Individuals, stamping it partially with a mix of brown and black inks.

And a closer look at that crackle!

Paper: Graphic 45
Die cut: Marianne Design
Flower: Prima
Vellum: Docrafts
Couple stamp: Rubber Dance

Thanks for coming by,