Showing posts with label Foiling. Show all posts

Saturday, 12 April 2025

Masculine card with stencils

Hello crafters, 
This fortnight, the Allsorts challenge optional theme, chosen by Val, is "Stencils/Masks". As usual, you can also enter with an "anything goes" theme.

In other news there is a new monthly challenge for tags and ATCs lovers Tag-Along (and ATCs), first challege starts 1st of May.

My stencil inspiration:


The background is a Gelli print I made with a DIY stencil by die-cutting numbers into a piece of card with the ALL & Create die set #33 Numberama (in black) and bits from the #39 Infinarty set. I also used the Ledger (TCW267) from The Crafters Workshop (in white) and Imagination Crafts (MA241) stencils.

I used Paper Artsy for the paints and with the stencils, Prima Heavy gesso (white) and DecoArt Media black gesso.
 
The focal image is AALL & Create Car from the #77 Climbing Wood die set, which I die-cut in pearlescent green (I was going for a metallic paint finish). I added some silverware with foil to the bumper and other accessories.

I cut the Gelli print and a mat with the set #33 Splodazzlers.

Finally I added a clip and a label, both die-cut with the #30 Taggletastic set, also ALL & Create. [Yes I'm a bit obsessed with their dies...] 

Hop on over to the Allsorts challenge blog to see all the DT inspiration and upload your projects. There is a prize from  From Lisa Horton Crafts, Pansy Corner layering stencils with coordinating die and embossing folder as well as a prize of two AALL and Create stencils.... for 2 lucky winners!


Thanks for coming by,

 Craftyfield   I am entering the Addicted to Stamps & More and Creative Artist challenge

Friday, 19 July 2024

All About the Gold

Hello crafters!
Today I am showing more Stencil Magic inspiration for our Country View Challenge held in the Facebook  group. This time I have used stencils with foils... 


I applied DecoArt Black Gesso as the base for my page. When dry I collaged a printed image (freebie) to this background with DecoArt Decoupage medium.

I then used several stencils (Mini Stencils sets 28,35 and 39 all from Stampers Anonymous/Tim Holtz with Cosmic shimmer Flake and Glitter Glue. This medium allows foils, metallic flakes or glitter to be applied on top, any time after drying, so there is no need to hurry up. Washing the stencils immediately though is strongly recommended....
I used 2 types of foil, Stix2 foils which work with adhesives and Go Press foils which are designed to work with heat (think Hot Foil Plates) but also work with the glue. I used both types because I wanted to have the 2 shades of gold.

I added colour around the gold stencilled areas and to darken or lighten certain "lost" areas of the image, such as the eyes with pencils, water based pens and gel pen (I tried different medias with varying degree of success).

With the foil reflecting light and surrounding colours getting a picture that gives a good idea of what the page looks like in real life has been difficult so here are 2 other photos in different lighting, the first taken with the sun on the page and the second in artificial light at night, 


In hindsight I should have painted the back of the image behind the woman with white paint or gesso to get the areas to shine through, whereas with the black Gesso she looks a bit too dark and that's without considering her decidedly morose outlook... 
Still, the end result gives a good impression of a centuries old painting, which I'm not unhappy with and I certainly had fun making this project.

To enter the challenge, hop on to our friendly group here and upload your project to the challenge album. You could win the FULL set of newly released Ranger/Tim Holtz® Distress Spritz 😲, yes you hear that right the FULL set... so what are you waiting for!!!


Thanks for coming by,
 Craftyfield   I am entering the Creative Artist, We Love To Create
                                                           SSS Monday, SSS Wednesday and Allsorts challenges

Friday, 17 December 2021

Stencils and foils double the fun

Today I am featuring on the STAMPlorations blog with a Mixed Media tutorial. Just in time for Christmas, I chose a technique full of shine.
And best of all it's a two-fer!!!


For the most reflective, metallic, shine, foils are the best. Today I am using Hot foils, which require the use of a laminator. (I think it is possible to use an iron but I  wouldn't risk it!)

Supplies:

Winter Flowers ARTplorations stencil
Gel medium (thick)
Hot Foils 

I made this card with the "positive" motif of the stencil:

 
The foil gives a mirror like finish which is difficult to photograph,
 so here's a picture showing the shine:


Then there is the "negative" which I used to make those tags to match:


And a picture without the sun reflection:


If you want details on the technique(s) I used , hop to the STAMPlorations blog to follow my tutorial.

Thanks for coming by,
 Craftyfield  I am entering the Addicted to Stamps, SSS Wednesday 
                                                          and River of creativity challenges. 

Sunday, 1 November 2020

Experiment in foiling

Only a few weeks to go before Christmas! You must all be fed up with making cards, no? 
Well, if you are, relax, our Country View Challenge, which this month is hosted by Jane, is "Not a card". 


I created a Masterboard with Fresco paints and stamped motifs from two Paper Artsy sets (ELB33, EEV06).
I had in mind testing hot foiling with stamped images and used 2 techniques on my Masterboard. The leaves were embossed with Frosted Crystal EP (Ranger Antiquities) and the wheat grass and has been stamped with gel medium before foiling.

These 2 techniques,  EP+foiling and stamped gel medium+foiling give VERY different results....


On the left before foiling, the stamped image have a lot of detail but after foiling the one that has been embossed is almost a solid image whilst the wheatgrass and leaf stamped with gel medium is barely visible.

So there you are both methods tested for you... 
If you want a better result, fear not as Country View Crafts is now stocking the latest tools from Heidi Swapp to stamp/write & foil
 

Over to you now, have a look at what the DT made on the Country View Challenge blog and link up your project to the challenge for the chance to win a £20 voucher for the Country View Craft shop.

Thanks for coming by,
I am entering the SSS Wednesday and Paperbabe challenges.


Thursday, 22 October 2020

7th Anniversary Day 4 Fall Leaves

Welcome to Day 4 of our STAMPlorations Birthday's celebrations !


The russets, yellows and brown of Autumn go so well with gold that I wanted to add some foiling in my make. One of the easiest way is with a stencil, some acrylic medium (this can be matte or gloss) foil and either a foiling machine or a laminator.


 I started with a manilla tag and applied  Fresco paints (Paper Artsy) roughly to the tag, spreading with a brayer. I then applied paints through the Leaf Prints 3 stencil and layered some acrylic medium on top here and there for the foiling process.

To foil I just sandwich the foil and the tag in a folded piece of paper, and run it through the laminator.

For my focal point, I stamped some leaves from the Trendy Leaves set inked with several colours of dye inks and fussy cut them. I shaped them and popped them on foam pads to add dimension and placed them on a piece of doily. 

Finally I added a Dymo label and a Nuvo Drop finish. 

A closer look at the shine from the foil...


***
The STAMP girls are showing inspiration for all the challenges on the STAMPlorations blog so pop by and don't forget to comment along the way for a chance to win (before the 8th of November)!

***
Whenever you shop for STAMPlorations products you can get 20% off with my code: STAMPGIRLCRAFTY 
AND during the Anniversary all orders placed with my code will include this not-yet-released stencil, Just Plaid square stencil (10 mil):

***


Thanks for coming by,


Wednesday, 11 March 2020

Her gaze

Today I'm showing my second inspiration make for the Country View Challenge on the theme "The eyes have it", chosen by my teammate Jane.


This is a project that took months to conceive but eventually came to fruition in a weekend... I had bought this Stamperia rice paper, not for a specific project, but because I fell in love with it and had to have it.  Of course the problem was, I didn't want to lose a single piece of it or obscure it in anyway, which  made it difficult to use it in a creative way.

So I went big... 12"x12" to be exact and the paper being A4 (21x29.7cms- approximately 8"1/4x11"1/5) I had some white space to add my own marks...
After months of creative drought I suddenly got excited to play with stamps, inks etc.. to create a a layout in the Vintage style that I favour.

 First, I divided the rice paper in 3 pieces, keeping the bottom left corner for another project and glued it in place with Mod podge. This paper is more sturdy than classic tissue paper and I was able to adhere the paper without wrinkles, although you may want to in order to have a more grungy look!

I gave a top coat of matt glaze to be sure the paper would be protected from any wet medium I might decide to add later...

I applied colour to the rest of the cardstock to blend it with the rice paper. No particular reason for my choice of medium apart from the fact that I wanted to avoid acrylic paints (it limits the choice of inks when stamping) and overly wet mediums.

Next I wanted to use my new Stamperia stencil, Wallpaper Fantasy and new stamp set - Enjoy to add interest to that (almost) virgin space.
I also used a texture stamp from Prima/Finnabair and although mine is from an older collection, you will find 15 different textures stamps from the Prima/Finnabair collection on the Country View Craft site, here.

With the stencil I used inks bottom left and gloss medium at the top of my layout, which I later foiled.

Next, with all the "messy" stuff finished I pulled out my Martha Stewart punches. They are probably seen as old school but unless you're the lucky owner of a Big Shot Pro, you cannot die-cut a 12"x12" page and punches are still the only way... Plus, I haven't used them very much, and they should earn their rather expensive real estate in my craft "room".

Once I had punched my corners and borders, I added more inks to blend the margins and distressed them too.
This particular corner isn't a PATP but a corner + unrelated border, which I have found a way to use together satisfactorily.

I then put together my focal point with a photo from an ephemera pack by Prima. The young girl and the woman had the same unyielding look in their eyes, which I thought perfect for our theme!

And now for the reveal....


I do hope you will like my page and join us in the Country View Challenge this month. As usual there is a £20 voucher to be won...

Do let me know in your comments if you have a lot of MS punches and how often you use them these days.
Thanks for coming by,
I am entering the SSS Monday (not a lot of green but a bit…), Vintage Journey and SSS Wednesday challenges.

Tuesday, 30 April 2019

Classic but striking

Today is our second inspiration day of the month at Crafts U Love! And I have carried on playing with the Go Press hot foil system and one of their recent Cut, Foil & Emboss Nesting Die Set. Go back to read my first post for a tutorial on the product.

This time I used the classic black and gold combination and wow... isn't that striking? Especially against the bright colours of the flowers!!!


I used an old technique to create my card, the name of which escapes me (if you know please tell me in the comment section as it has been driving me mad) to create my design.

First I stamped and coloured Julie Hickey Designs Flower Garden stamp then selected 3 of the nesting Bracket Frames dies to die cut the image all at once .

I then used 3 of the alternate sizes of dies, starting with the largest to cut, emboss and foil mats out of black card all at once.

All that remains is to glue the shapes on top of each other, in alignement, and add a sentiment from the Julie Hickey Everyday Sentiments stamp set.

I didn't have a lot of time to test other materials but I did managed foiling on leather and this is a fabulous way to create small gifts.

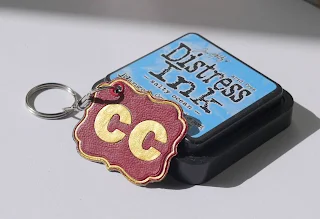
I made a double sided label to add on a key ring (think memory sticks too) with 2 thin pieces of leather, sandwiching a piece of card for added strength. Mine were off-cuts from another project but you can find nice unblemished leather in 12x12 sheets in the Crafts U Love shop.


1. Cut, emboss and foil the top shape


2. Die cut a motif or initials from the foiled shape.


3. Foil the initials

4. Repeat for the other side and die cut a piece of card with the same die.

5. Glue the leather shapes to the card shape and add the initials. (If you haven't foiled the initials you can reverse the colours and place the red initials in the blue shape and vice versa for more interest)


6. It should now look something like this…

The blue leather was much more textured than the red so the foiling has a distressed look about it, but hey we crafters love a bit of distress, don't we?

To finish set an eyelet and place on your chosen key ring.
Below photos of the front and back.

 
Supplies:
Julie Hickey Designs Stamp Set - Flower Garden
Couture Creations Cut, Foil & Emboss Nesting Die Set - Bracket Frames
Julie Hickey Designs I Need It Stamp Set - Everyday Sentiments
Versafine Onyx Black ink
Foil
Leather 12x12 Sheet


Should you purchase any of the products I have used on this card, select  'Design Team'  in the 'where have you seen us' drop down so we know we have inspired you!


Thanks for coming by,
I am entering the challenges.

Saturday, 25 August 2018

Memories of summer

Time for a second inspiration piece for our Country View Challenge on the theme Sun, Sea and Sand chosen by Corrie. I have made a card with another piece of alcohol background on Yupo using Tim Holtz's Alcohol lift ink.

Sunday, 22 April 2018

Foiled

Foil is everywhere at the moment, having a revival it seems, in the craft world. Time to pull my foils out along with other older supplies and create something new.


Friday, 18 December 2015

Calendar Challenge last page!

Yessss... made it! I now know how Hercules felt!
The theme this month was Tree and Gold/Silver and I chose an old freebie stamp set and stamped the tree in black Versafine and the some of the smaller motifs with glue (Flitter glue or similar).
When the glue was touch dry (but permanently tacky) I applied gold foil over the top.


Stamping with glue is not easy... It's transparent so there is no way of seeing how well it has stamped, in this case the gold motif have a "distressed" look about it, which is when one invokes the grunge inspiration...


There may be a bonus post with a few pics of my assembled calendar if Christmas preparations don't swamp me completely!
Also entering the Artistic Stamper and We Love To Create challenge.

Friday, 25 September 2015

1st Christmas card of the year

Yep, had to happen at some point... the Christmas card production has started at Craftyfield Towers!

I have been playing with Brushos, as this is the theme at Paper Artsy this fortnight, so this was my starting point for this non traditional Christmas card. I initially took inspiration from Helen Chilton's post but as my piece turned into a disaster I abandoned the idea and let the Brushos do their thing!


I stamped numbers (the 24 days leading to Christmas and the 25th) and embossed them in clear before applying the Brushos in Blue, Purple and a little black around the 25.
I stamped in black Versafine the baubles and Christmas trees from a magazine freebie set.
I also stamped the sentiment from the same set with glue and silver foiled it.

To decorate I added white and silver gel pen accents as well as snowflake die-cuts which I silver foiled. Another photo to show the shine:

Thanks for coming by,

Also entering the Country View Crafts (Numbers), WOW Embossing Powder and Craft Barn challenges.