Showing posts with label Impression Obsession. Show all posts

Wednesday, 1 February 2023

Valentine's card - Together

Happy day! Today is the day of our new Country View Challenge, hosted this month by Jane who has chosen "Be Sentimental" as this month's theme.
Of course we expect to see lots of Valentine's cards but the main thing is to have a sentiment, a phrase or some inspiring words... so quite a lot of options.

For my Valentine card I used quite a few oldies:


First I cut a piece of masking tape the same size as my base card: 6"x6" and stamped the heart (Papermania Sew Lovely - part of a magazine freebie I believe and probably 10 years old...) on it. I then cut it out, keeping both innie (the heart) and outie to use later.

I left the heart stamp on the stamping platform so I was sure to have the stamp in the right place when I came to stamp it on the base card.

I positioned the outie on my base card and stamped a texture through the heart opening, here a Create A Card stamp by Impression Obsession with a canvas texture.


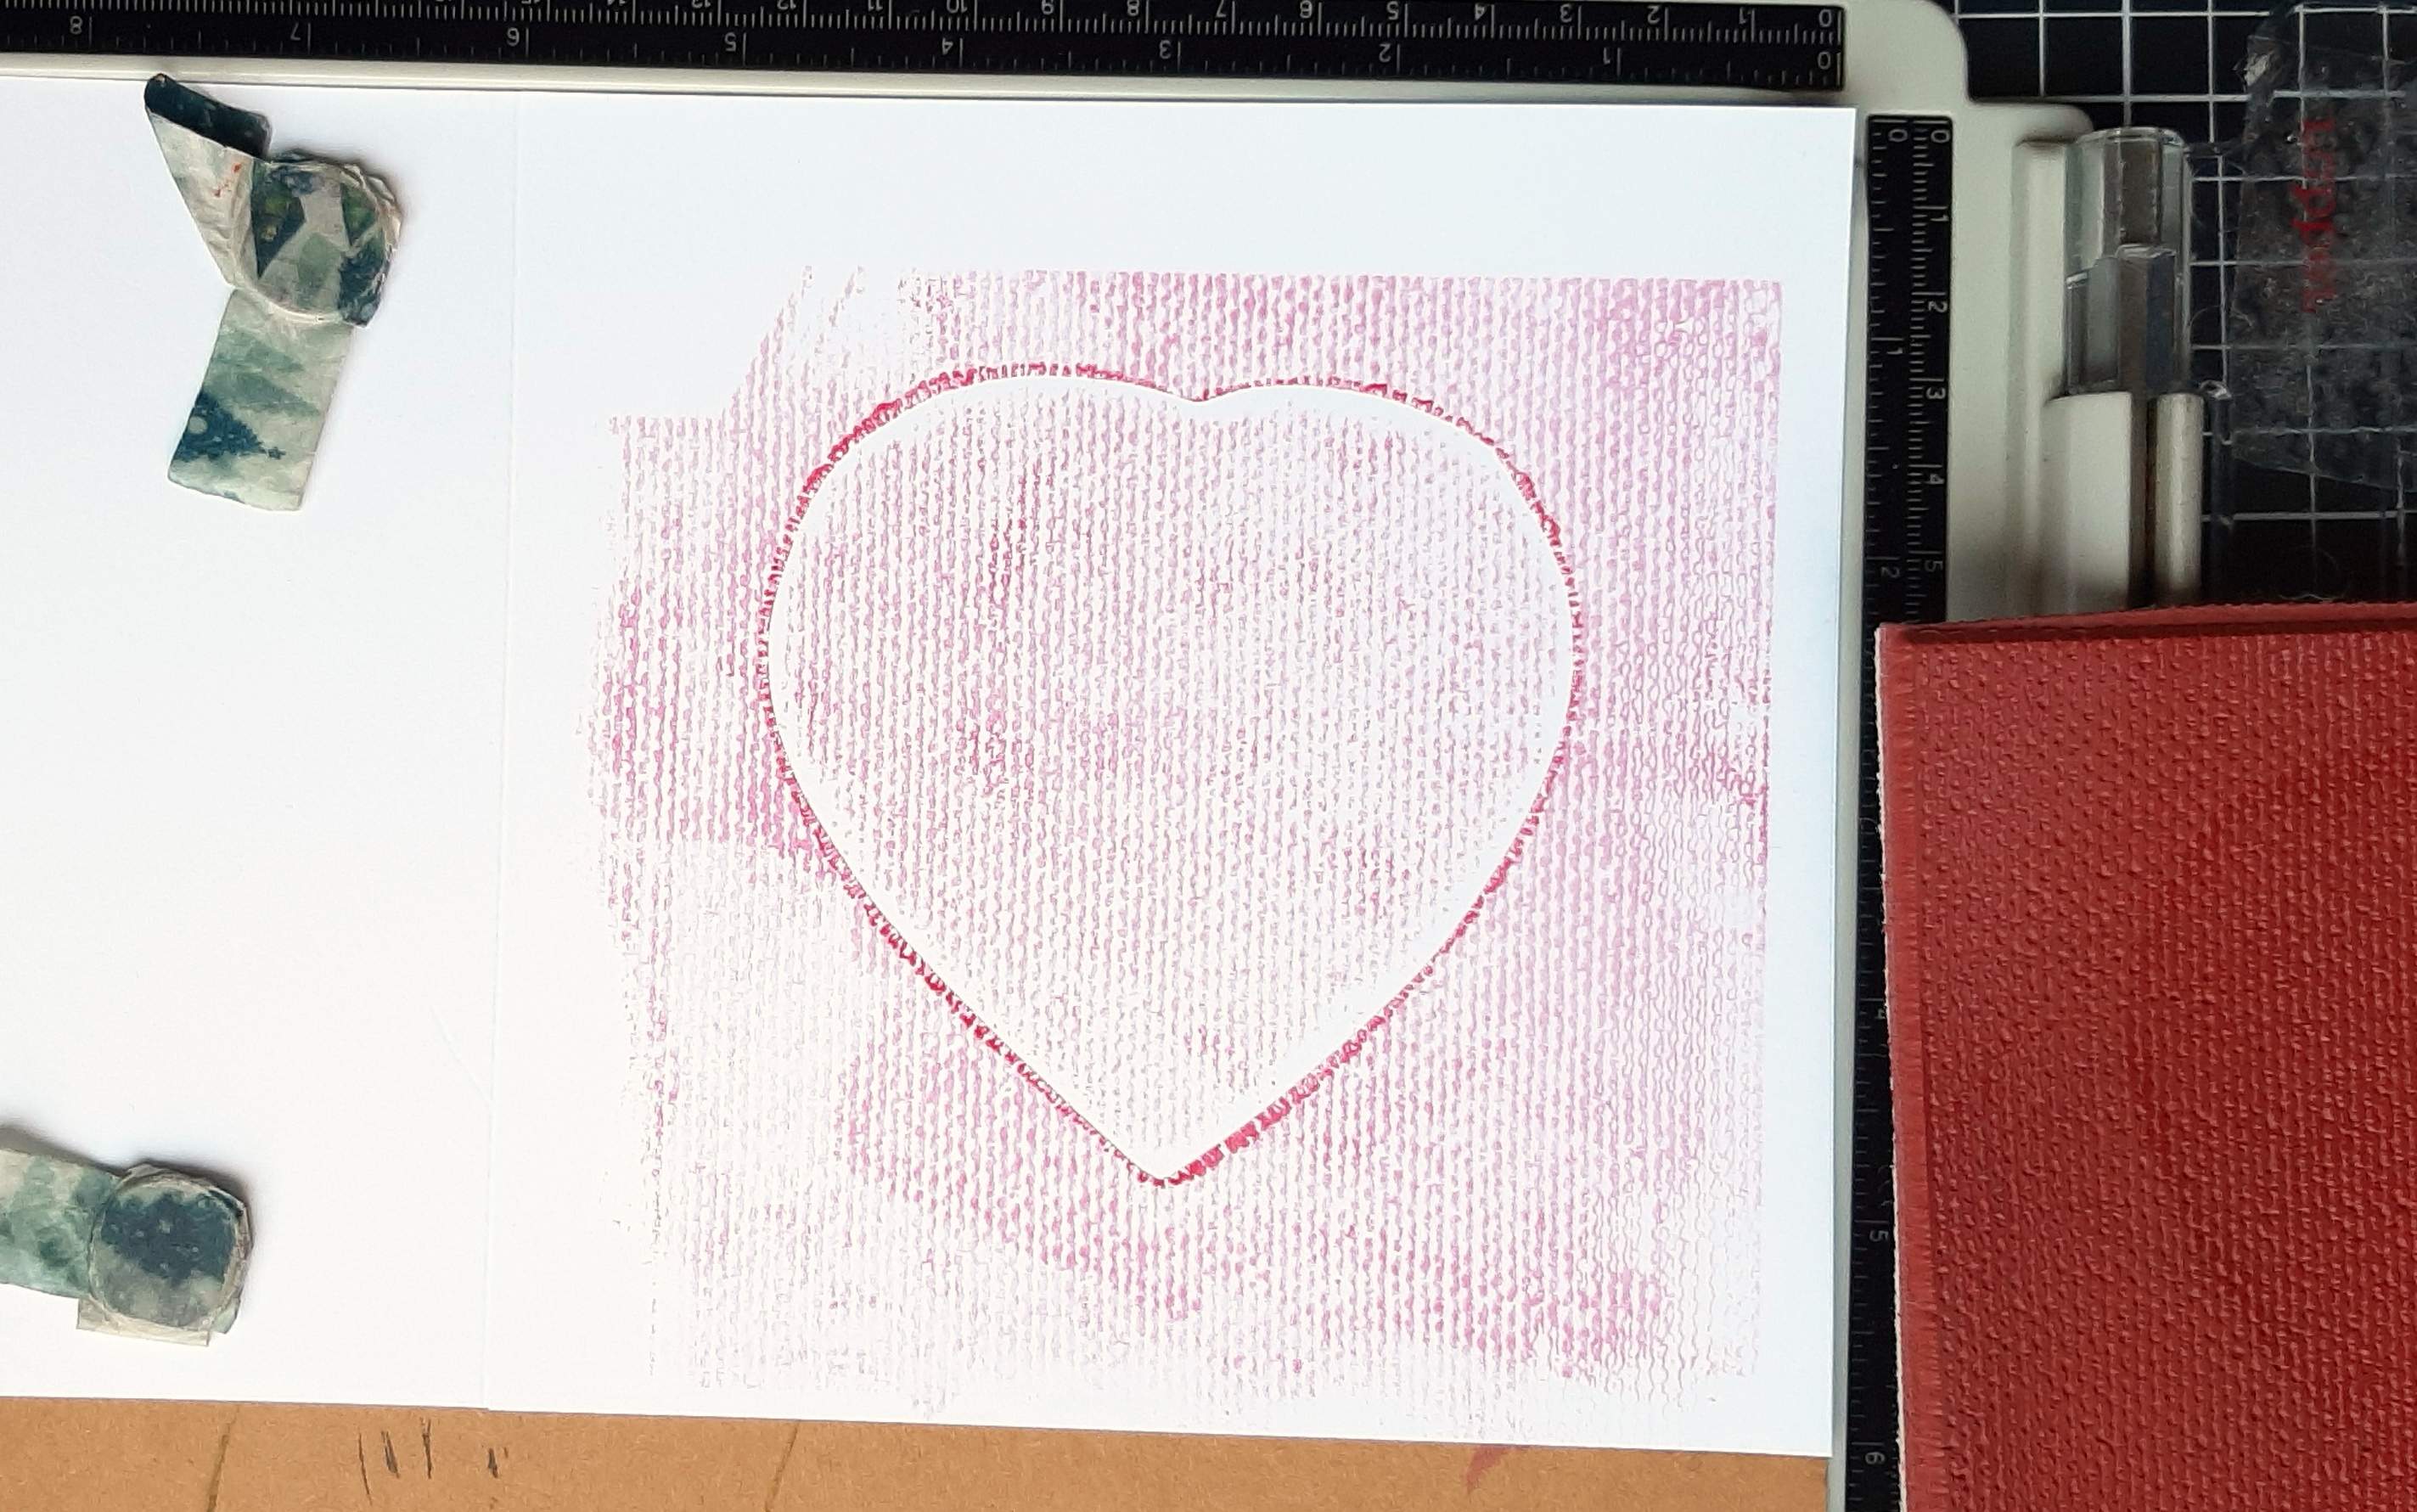
Then I stamped the heart on the base card, phew perfect placement!

I positioned the innie onto the base card to make sure the sentiment I was going to stamp was in the right place and straight... When happy I took the heart mask off and stamped on the base card.


I added a background with a stencil from the Mini Stencil Set THMST010 (Stampers Anonymous/Tim Holtz) and some Distress inks.
Finally I added some other words as some sort of embellishments, both by Rubber Dance, the quote by Josiah Holland and the "Always" from a very well liked Nostalgic Couples set and the Together from the Beautiful Words set.

This is taking me back to stamping at its best and, if the object of your affection is far away, perfect for posting as it is absolutely flat with no added weight!


Over to you now, have a look at what the DT made on the Country View Challenge blog and link up your project to the challenge for the chance to win a £20 voucher for the Country View Craft shop, just make sure you follow ALL the rules (they aren't that many...)


Thanks for coming by,

 Craftyfield   I am entering the SSS Wednesday challenge

Tuesday, 1 March 2022

Multicolour stamping and old supplies

New month new Country View Challenge! My teamies and I have lots of inspiration for you on our theme, Mother's Day, hosted by Evelyn. (In the UK, it is celebrated in March) . 

I pulled out old supplies, loved but underused, for my card: 


The stamps are from Impression Obsession: Dress Form Trio (F13086) and Rose Print Background (F8867). I stamped the first with a Kaleidacolor inkpad (Sea breeze) and applied several colours of Memento ink to the second. I cut the stamped Rose Print in 2 and glued it into place behind the Dress forms. 
The sentiment is a printed label from a magazine to which I added a heart gem. 
The red die-cut is a Nellie Snellen border die and since this was very much de rigueur 10 years ago, I used my Corner Chomper for the focal image and its mat!

Well that was a trip down memory lane... Does this resonate with you, long time crafters?

******
Do join us by creating a Mother's Day inspired make and link up your project to the Country View Challenges blog for the chance to win a £20 voucher to spend at the Country View Craft shop.
Just remember to follow the theme AND the challenges rules!!!

Thanks for coming by,

 Craftyfield   I am entering the Paperbabe, SSS Wednesday challenges

Monday, 1 October 2018

Friday, 11 May 2018

Running out of puff

Many thanks for your kind comments on my first Humorous make for the Country View Challenge. Glad so many of you liked it!
Today I am showing a second inspiration make on the Be humorous theme, chosen by Monika. I had had a flash of inspiration for my first piece but sadly the muse deserted me and I resorted to my one and only humorous stamp for this card.


Sunday, 11 February 2018

Paper Anniversary

Happy Sunday!

It might be cold today but at least the sun is out in force... Which is good news for bloggers who have to take photos in natural sunlight! I can't tell you how awkward was my last photo session in the gloomy daylight of a cloudy winter day!

Anyhoo...
For this First Anniversary card, I took inspiration from the occasion and created a card with a "Paper" theme.


Thursday, 1 February 2018

Fauxdori Address Book

This month it is my pleasure to host the Country View Challenge and I have chosen an easy theme of "Anything but cute".
I made another Midori-like book, this time to hold an address book. I keep the addresses on the computer so I can easily add addresses or update them, and the flexible binding of this type of book allows me to take out the old and replace with the freshly printed pages easily.

I'm not showing a step by step today but if you need one, I made one last year here.


Sunday, 15 October 2017

Fire and Ice

Paper Artsy is having a Glitter fortnight and I have been inspired by Nikki and the fab technique she used on her project and was running out of time to enter the challenge....


I used a double sided adhesive sheet and placed some die-cuts on one side (Diesire - Delicate Swirls Overlay Die) before applying gilding flakes (IndigoBlu Winter Dawn).

On the other side I placed a pine branch die-cut (Impression Obsession Pine Branch), which I had already embellished with embossing powders (White, Aged Aqua - Stampendous, Wow Seaglass).

Tipped half a bottle of fine glitter over it (Art Institute)... Added a sentiment die-cut from black cardstock - I'd planned to emboss it with gold glitter but I felt I had reached the point of TOO MUCH glitter already!

And unusually for me no stamping...

The shining effect is incredible, although in my case, as the glitter is blue, it does interfere with the lovely warm colours of the gilding flakes. A close up and like Nikki I am attempting video:

I would recommend the technique, despite the glitter mess and bits of flakes flying around, well worth it in the end!

Thanks for coming by,
Also entering the Addicted to stamps challenge.

Friday, 21 April 2017

Trying out the Distress Oxides

After seeing Tim Holtz demos I had to lay my inky hands on some of his latest ink formulation, the Distress Oxides. He promised they would be different to anything we've used before and it's true.

Today I'm showing a step by step of a card made with Distress Oxides over the Craft Barn blog and I share my experiments.

Supplies:
Distress Oxides in Faded Jeans and Fossilized Amber
Impression Obsession Cover-A-Card Rooster
Honey Doo Lilies stamp set
ELB33 from Paper Artsy stamp set
Carabelle Studio Weft fabric and numbers Stencil
Black Lace: Docrafts
Flower: Prima (antique collection) re-coloured with the DO inks of course!

Do pop over the Craft Barn blog to get all the inside info!

Thanks for coming by,
I am entering the Craft Stamper TIMI and Fashionable Stamping challenges. (one of my favourite things is making my own "paper" with large background stamps)

Sunday, 5 February 2017

Quickie Valentine

Welcome back to the second inspiration post for the Under 30mns challenge at Country View Challenges.

Let me first say I had trouble with that one... so much so I had to abandon my first project as I couldn't find a way to finish it in the alloted time. In theory it looked quick, but in practice... However I still wanted to come up with a card involving die-cuts, and, since Valentine's Day is round the corner this is what I made:


Dies:
Memory Box : Tessatina border
Sizzix/Tim Holtz: Celebration words Handwritten
Die'sire: Valentine

Stamps:
Sewn heart: From Creativity Magazine Jan/Feb 2014
Canvas texture: Impression Obsession Create-A-Card

Other:
Versacraft in Cherry Pink
Distress ink in Spun sugar
Frosted Crystal EP by Ranger.

I stamped the Sewn heart first with the Versacraft ink and overstamped the canvas texture with Distress ink, embossing with the Crystal powder which has a matt finish.

For time saving purposes, I did all the die-cutting in one go adding a piece of Wax paper to my sandwich to help the cardstock glide out of the dies.

Also for speed reasons I spent as little time as possible applying glue on the die-cuts which means that some bits can be lifted but, since I don't expect the recipient to pull on the sentiment, it should be fine!

Apologies for the lacklustre photo, which is actually a scan, but the sun just wouldn't play nice and I was running out of time! In real life the pink is brighter more fuschia than on the scanned image.

I am really curious as to what you will be making under 30mns for our Country View challenge, and if you find it easy or tough!

Thanks for coming by,
I am entering the Memory Box, Stamplorations CAS and The Artistic Stamper  challenges.

Thursday, 1 December 2016

Triple Time stamping

Today I am showing this opulent red and gold creation over at the Craft Barn blog.


I only used one stamp for this card, a Cover A Card from Impression Obsession. Come by the Craft Barn blog to see how I made it...

Thanks for coming by,
Also entering the SSS Wednesday and The Artistic Stamper challenges.

Friday, 21 October 2016

Pumpkins

Another spooky make...

This one is featuring at the Craft Barn today where you can catch a step by step.


Do pop over to see the details here,

Thanks for coming by,
I am entering the Fashionable Stamping challenge and Nefertiti's first challenge.

Saturday, 10 September 2016

Gardening

Not long left to enter my card in the Craft Barn challenge, where we had to illustrate "what men like to do on a Bank Holiday".
So I thought about what MY man does on a bank holiday... gardening, going to the garden centre and pottering, at least when the weather's clement.

I have been looking through some of my older stamps, which I have a tendency to neglect, and unearthed this beauty from Impression Obsession.


I used papers from a HOTP paper pad, including the pre-cut flowers and, as a background to the garden shed, I used a piece of card I had created by mopping up left over Brushos from another crafty session.
A piece of Core'dination die-cut with my Stitched Squares set frame this image (a Gary Robertson design).

Thanks for coming by,
Also entering the Stamping Sensations, SSS Monday Challenge, SSS Wednesday Challenge and Craft Stamper TIMI challenges.

Sunday, 17 July 2016

Making a scene

The sun has been very shy in the UK but at last we've had some hot temperatures and can think of summertime and keeping cool by the sea...


I created this scene with Life's a Beach Girlfriends (Crafty Individuals CI-284) and Cape Lookout Lighthouse (Impression Obsession) both stamped in Versafine Sepia. On reflexion the Sepia image didn't make an impact and I decided to add colour with pencils.

I finished by adding some seashells embellishments made out of super light air dry clay and decided to keep it CAS(ish),  light and airy like the seaside breeze!

Thanks for coming by,
I am entering the SSS Wednesday, That's Crafty, Polkadoodles, Live and Love Crafts, Paperbabe, Anything but cute and Craft Stamper TIMI challenges

Wednesday, 18 November 2015

Owl and grey

Time for the November calendar page at the Craft Barn where we need the colour grey and an owl.

Let's get the apologies out of the way first...

The photo is pretty bad but there's just not enough light at the moment, between the days getting shorter and the sun shunning us in the UK so I used the flash.

And the page isn't very good, mainly because I only had one owl (from some magazine freebie) and my image transfer turned into a nightmare and I had no spare owls. Not sure what happened there, I guess it's the type of paper...


I inked my base in grey ink with a brayer and partially stamped the Impression Obsession Branches CAC, having masked the moon first.

To enhance the owl image which looked white after the transfer I added alcohol marker in a few places where I could make out the original design.

Hoping my next (and last page) will go better...

Also entering the Tando Creative(W3) challenge.

Saturday, 24 October 2015

Good Luck

If the Craft Barn is not your local craft shop, you may not be aware that the physical shop has closed last weekend to become an online retailer exclusively. So, the challenge this week is a bit special and, whilst last week the Craft Barn DT was using Impression Obsession Cover A Card background stamps, our challenge is to make a Good luck card.
Still, I was intent on using my own Impression Obsession stamps which are one my favourite brands...

In a departure from my usual makes this is an hybrid project where I combined the rubber stamped image (I stamped the IO Ornate stamp with Versamark and used soft pastels on top in several shades of blue and turquoise) and digital elements in the form of a poster and a sentiment.

So there it is, wishing the Craft Barn all the best for the future whilst trying to keep calm about not getting my usual crafting fix at the shop, since I can still Keep on shopping...


Thursday, 15 October 2015

Light-house

This week's theme at the Craft Barn is Light and I thought of this beautiful lighthouse stamp (Cape Lookout Lighthouse by Impression Obsession). I worked on a placemat which is part of a series,  so I followed the same colour scheme but this time I used a Clean and simple design to let the Light shine...


After stamping the lighthouse  I saw Turner-esque sky and atmosphere. OK Turner wouldn't have painted his sky green but I was seeing past the actual hue... Well I couldn't bring myself to detract from that impression, so I tentatively stamped in white pigment ink the water splash, then the quote (both from KTZ135 set by Katzelkraft) leaving an awful lot of white space (again green but you know what I mean...).
I do hope you get the strong sense of light that I do when looking at this picture.

Thanks for coming by,

Also entering the We Love To Create challenge.

Saturday, 13 June 2015

Garden Shed

Today is another masculine card, Father's Day coming up soon...

It's been a while since I used papers rather than make my own background, so for a change, I pulled some HOTP freebies, cut a few pieces and distressed them with scissors before layering in a carefree fashion.

To give the card maximum texture, I started with a textured card base and to my papers I added some Kraft Core'dination cardstock embossed (Woodgrain) and sanded.
The freebie pack came with die-cuts sheet of flowers and labels so I used a flower on the front and a label for the inside, stamped with the sentiment.
The image is the Garden Shed by Impression Obsession and I coloured it with alcohol markers.

Less fun than messing with paints but packs of papers like these take all the guesswork out of picking the right colour scheme.

Thanks for coming by,

I am entering the Craft Stamper, Polka Doodles and the Live & Love Crafts challenges. 

Thursday, 21 May 2015

Phone bag

Not quite back into the blogging rythm yet but a quick post to show you a make I needed before travelling.
The Craft Barn challenge this week is on the theme of bag and I needed something for my new phone. Maybe it's more of a cover than a bag but it's mine... I made it... and miracles of miracles the sewing is almost straight !


Like my previous phone bag, I used recycled materials for this make, the fabric is from a school shirt painted blue, the inside is a remnant from an old ironing board cover.
I simply used stamps to decorate with black Versafine, on the left Damselfly with Boat from Impression Obsession and right a stamp from the Paper Artsy set ID02.

Now my phone can join the murky depths of my hand bag and live cheek by jowl with keys and such like without fear of scratching. Now to learn how to use the ruddy thing... (the phone, not the bag!)


Thanks for coming by,


Sunday, 19 April 2015

Pretty in pink

This is the theme over at Stamping Sensations this month. Rather than go for pastel shades again, after my twee Tea Party card I went bold with Fuchsia, metallic and black.

I first used a Prima doily stencil with Pan Pastels on both my white cardstock and my black base (I used a spellbinders die), a light blue and light mauve.


I stamped the dress form stamp (Impression Obsession) with Versamark and embossed in clear. Yes in clear....
If you keep abreast of what's hot in the craft world then you'll know that foiling has made a comeback in the US and this trend is just reaching Europe. There are special foiling machines, but apparently laminators work as well.

I don't have a laminator...

Then I saw this video from Jennifer McGuire and thought maybe this could work with a clothes iron and set out to try.

Once embossed put the foil over your stamped image and place a piece  of paper on top.
Iron the whole thing and voila... foiled image. Now you'll want to know how hot, how long and to be honest I haven't worked out yet the best settings, but I have found out the following:

- not too hot : Wool or less
- not too long : one pass should be enough.

Too long or too hot the embossing sinks into the paper and the foil doesn't stick to it. You can see from my piece that some foil has stuck elsewhere too. In my case I didn't mind  but that could be a problem.

I have also foiled the border of my card base and my sentiment but this time I sponged glue to apply the foil.

Let me know what works for you if you try the Iron Foiling technique!

Tuesday, 28 October 2014

Same stamp different ways

This is the WOW! Embossing Powder challenge for this October month. I liked the theme but I couldn't get any ideas on what to do so I played around with different combinations of stamps and techniques until I nearly gave up!  I had one last go at the week end and finally chose what to do. I kept it simple using just one stamp and a minimum of embellishments.


I first inked the Snowflakes background stamp (Impression Obsession) with a multi coloured inkpad.
For my second way with the stamp I white embossed a matching piece of cardstock. I then die-cut a piece with a Spellbinders die and threaded through some blue paper as a "ribbon".
I then decorated my strip with very small die-cuts in silver.

The most time consuming part of the card has been the gluing of the tiny gems at the centre of the small snowflakes!

Thanks for coming by,