' ' ' 'Crafty Endeavours: February 2015

Wednesday 25 February 2015

Miniature & Embossing powders

The topic over at Paper Artsy blog is Miniatures. I was inspired by the glossy pieces Leandra showed in her post but as I don't have Ice Resin I thought of embossing powders.
Now have you ever had cardstock buckle after a layer of embossing? So much that the embossing cracks? Well, me too... For this project I wanted to make sure there would be no buckling so I selected a hard and thick surface, a Tando Wavy Arch.


I used a technique shown by Trish Latimer here. I applied several colours of embossing powders in layers finishing with a WOW Blue Pearl in combination with a stencil and detail white with a Paper Artsy stamp (Hot Pick ESN10). At this stage as there is quite a thick coat of EP the surface turns liquid and it's difficult to keep the details. Still I managed to get the effect I wanted and I had LOTS of fun doing it!

And another pic so you can see the Blue Pearl in action:

I am also entering the Craft Barn and Tando challenges.
Thanks for coming by,

Saturday 21 February 2015

Pastel shades footwear

This week's Craft Barn challenge is about shoes. I immediately thought back to my early days as a card maker when the height of sophistication was shaped cards. Back then, not many people had die-cutting machines and I was yet to get into stamps, so shaped cards was a way to make things a bit more interesting. I had designed my own template and as I keep all sorts of things I still have it and pulled it out for this project.

My colour scheme of pink and white was suggested by Pan Pastel UK challenge and as I was pulling out papers to embellish my card I found this pink card base and decided to go with it instead of white. I realised this cardstock had a white core and this gave me the idea of embossing and sanding back.


The folder I used is the first one I ever bought,  Stylised Flowers by Cuttlebug. I added a piece of hearts border (X-Cut 12" border die), eyelets and ribbon. Again if you have been crafting for a long time you will remember that eyelets were all the rage so it seemed fitting for this throwback to give it some of my collection.
I also gave my boot a white sole, well if Louboutin does it red why not white for mine!

There you have it, boot for the girly girls!
Other challenges: Bunny Zoe's Crafts and Wedodoobadoo

Thursday 19 February 2015

Trying out techniques

Yep, I am a technique junkie, I have to try everything.... I decided to have another go at the brayer technique that I have seen Leandra from Paper Artsy use to great effect. My first attempt was so disappointing that I switched to a credit card mid-way through my painting!

I think it had something to do with my brayer being sticky for some reason. I put some talcum powder on it the last time I cleaned it and it seemed to have done the trick.


For the background I used Fresco paints in Vanilla, Tango, Limelight, Sherbet and Lavender and stamped motifs from the EEV06 and ESN10. As a feature stamp I used a sentiment from Hot Pick 1206.

Then I tried out another technique taking inspiration from Nataliya, DT on the Wow embossing powder blog, applying embossing powder on top of texture paste. I used both Wow Grapevine and Cosmic shimmer Aurora because I couldn't remember if the Aurora was translucent or not. Still can't tell from this experiment but having both colours adds variety so it's all good!

I suppose I should tell you what IT IS.... Well this is the cover for the calendar I am making, one page per month,  which is why I added a die-cut piece of clear packaging stamped with... OMG just realised... the wrong year! But PHEW... I stuck it with tissue tape so it could be changed the following year. I guess I will have to change it sooner than that!

Thanks for coming by,

Monday 16 February 2015

Love travel

Valentine's day is the big event on the blogs and as I have already something prepared I opted for a love of a different kind....

The Rubber Dance colour challenge for February has a theme of Love and the colours Turquoise Chocolate Brown and Deep Red. I went overboard with these dark colours and the result is ... well... dark!

This also meant I had to do most of the stamping in white acrylic which doesn't do justice to the details of the stamps.


For my background I used Gelatos, overstamping images from the Rubber Dance Travel plate, stamps I won recently on their blog.

I added a heart die-cut which I painted with brown paint, a layer of crackle (Imagination Crafts) and a top coat of white paint. I embossed a piece of metal with the word Travel as a finishing touch.

I am also entering the Imagination Crafts and the Live and Love Crafts challenges.
Thanks for coming by,

Saturday 14 February 2015

Mini Album

Last week at the Craft Barn blog was Mini Album week. I immediately selected Dawn's project as one I could actually make without too many hiccups. Hmmm... hiccups were had and what should have been a 3x6" album ended up as a 3x3". In the process it also turned into a pocket book as each page has now an opening in which to store...stuff, haven't worked this one out yet since this wasn't my original plan - If you feel inclined, ideas in the comments would be lovely -
The pockets openings are alternatively at the top or the side of each page.


Anyhoo... I used an unloved double sided paper to make my album and decided to forego any stamping/stencilling etc... on the now small pages. I made 2 covers from recycled packaging, covered with paper from my scrap mountain.
For the front, I die cut vellum with the Persian Accents dies from Spellbinders, and coloured it with alcohol inks (Pearl and Cranberry), layering the pieces on the front.


There you have it... I think this style can be easily adapted to a 4x4" album which would be a better size to include photos, otherwise I'll have to try Dawn's album again without making a mistake!

Thanks for coming by,

Thursday 12 February 2015

Calendar Challenge February

For this second page of the Craft Barn calendar challenge, our given colour is Red and we must include Hearts.

February is an odd month, the glow of the end of year festivities has passed, the cold and wet weather is firmly installed and there is little to celebrate. I decided to focus my page on Valentine's day, as most "significant" occasion of the month.

Don't go thinking I don't own any heart stamps, I do. Several in fact, and in a bind I could even die-cut some!
It's just that I had a vision and I couldn't rest until I tried it.


I drew a heart shape on scrap paper and cut it out with a craft knife. Then, using both the innies and outies heart shapes as masks, I stamped in red ink the edges of the big splat from the Messy Art stamp plate (The Artistic Stamper). Here and there I stamped the small spots from the small splats stamp of the same set.
The execution could have been better but the result is fairly close to what I had in mind.

I added the word Valentine in the postal stamp frame (Craft Stamper freebie) and the arrow from another heart stamp, also a Craft Stamper Freebie, extending the line to fit my heart.
As for my January page, the calendar itself is attached by a brad and rotates to open and close.

I am also entering the Artistic Stamper challenge.

Thanks for coming by,

Sunday 8 February 2015

A man and his dogs

A masculine Birthday card today, in honour of Artful Times challenge.
I so enjoyed making my Tim Holtz inspired tag last week that I decided to join the Vintage Journey challenge and play Tic Tac Toe with them! I selected Ideology/metal, Sprays and Ribbon/Twine.

I started with a small piece of patterned paper as I am still trying to use more of the stuff ! This came from a freebie in a magazine (Home Grown from Hot Off The Press). To the right I created a panel with sprays, a home made reddish brown made with Distress Inks reinkers, and a blue Prima Bloom. 
This is my first test with the spray and it is more powerful than the Tattered Angels ones so beware cover your surfaces!
I used a Crafter Workshop stencil with the sprays and finished with an Ideology Mask/stencil and Walnut DI.


The main image is stamped with the dogs from the True Gentleman plate (Flonzcraft), distressed with Antique Linen & Walnut DI, matted on a very old patterned paper from Sizzix (I do believe my first paper purchase, and yes I still have most of it!).

I created 2 tags with an Impression Obsession die, colour matched to my paper with DI and overstamped with one of the matching stamps for the die set in red ink. I used the tags for the sentiment (from my own collection).

To finish I used twine, and a metal embellishment to which I applied black alcohol ink to the recesses. This isn't an Ideology piece but something I saved from the bin!
An old sticker (another magazine freebie) pulls the theme together and injects a bit of bright colour.

Thanks for coming by,

Tuesday 3 February 2015

Love & Romance

February arrives and it's all about Valentine's day! I didn't want to make anything "twee" though since I am likely to give it to a man! So I took inspiration from the Vintage Journey challenge to attempt to make something in Tim Holtz style. But how do you define his style? Well I am not an expert...
I settled on the following criteria: TH and tags are forever linked so it had to be tag, distress inks had to be used, stamping, and of course the TH Lovestruck die. The Cupid was too big for my tag so I used only the heart and arrow.


I wanted to play with water too so I got some paint to drip down my tag, this washed away some of the distress inks, never mind, I liked it this way.
I gave my heart some crackle, as TH is fond of crackle, added metal in the form of foil where Tim would of course add some of the ideology stuff.

Stuck on my tag are remnants from other projects, it was either that or the bin :
2 pieces of stamped tissue paper (Paper Artsy stamp), plasterboard tape, the 2 hearts piece of a border die cut, scrap of textured paper. This will give you an idea of how much I actually keep!

Something was missing in my background so I added some stamping using a stamp from the Stitch and Frame set, part of the pile of stamps I recently won at the Rubber Dance Challenge.

Hope you'll like my TH inspired piece,


Other challenges: Country View Crafts, Pan Pastel UK, Wedodoobadoo

Monday 2 February 2015

Spring colours

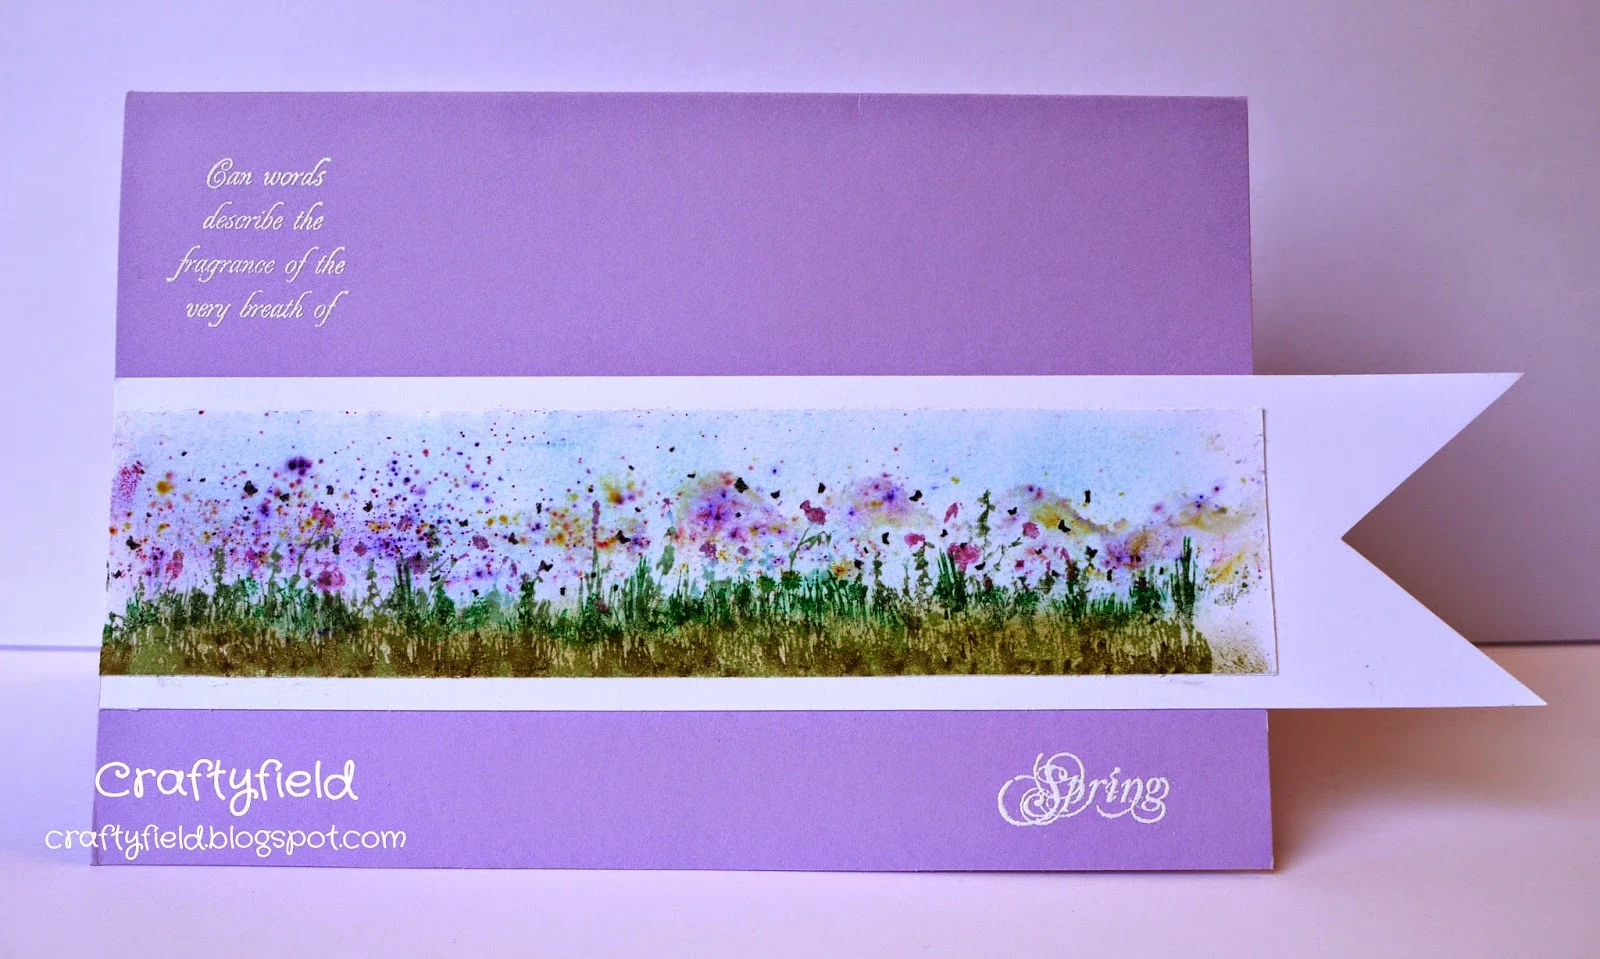
Welcome to the new challenge at Vintage Stamping Challenges where this month's theme is Spring Colours.

I saw this set of Grass and Meadow Borders and immediately thought about a wild spring meadow. Of course the borders will look great silhouetted in black against any coloured background but I wanted to try them in colours, building several layers to make a meadow.

I used watercolour paper and painted the sky in blue watercolour. I then roughly masked the area for the flowers which I sprinkled with water and Brushos. I then stamped my borders (3 stamps) layers, inking with inkpads but mostly with pens in a variety of colours.

I cropped the meadow in a long rectangle and matted it over a flag banner, mounting it on a lavender card base. I then simply added a sentiment embossed in white.

Love the details of the stamps coming through, see those tiny butterflies?
If you like the technique but don't own any Brushos, the same effect can be achieved by scraping watercolour pencils or crayons on a wet background with a sharp craft knife (sparingly).

Why not join us and create something full of the joy of spring! As always, you don't have to create a vintage project, but you DO have to include stamping though - no digis allowed. Our lucky winner will receive a fab prize of a $20 voucher from Flonzcraft so don't miss out on your chance to win!
Go on and hop on over to the Vintage Stamping Challenges blog and see all the DT’s work for more inspiration.

I am entering my meadow in the Stamping Sensations challenge.

Sunday 1 February 2015

Shiny Things Inspired by Pam Thorburn


You may recall this book cover (image right) which  I decided to complete using the same colour scheme but with shine!
I took inspiration from Pam Thorburn's project that you can see here with her step by step and Finnabair Sparkle and Shine blog hop.

My base textures were sequin waste, drywall tape (joint tape/scrim), Memory box Tessatina die-cuts, X-Cut Corner die-cut (from the Trim Borders set) and a piece of lace. Sadly this last piece doesn't work particularly well.
I also used the letters to form the word "Dies" since this is what my book will contains. Sounds ominous, but I couldn't think of another relevant word under 5 letters!

I applied my metallic tape with pieces roughly cut to the sizes of the different textured areas in a bid to make the joints look as natural as possible. A slow progress and delicate touch is required at this stage, the tape is thin and can tear (translation: it did tear!)

After painting with Frescos and removing the colour from the highpoints I added Gloss medium in the recesses, here and there, to adhere fine glitter for more shine...


To finish I used a stamp from Paper Artsy Hot Pick 1204 and made embellishments with Tim Holtz Hardware Findings die, painted, crackled and silver foiled in places.

And if you wondered... yes I haven't finished the spine! I plan to use fabric for that so I don't have to deal with any cracking.

Thanks for coming by,