Saturday, 3 June 2023

Desk Tidy with Stamperia

I am back for more inspiration for our Country View Challenge, which I have the pleasure of hosting this month.  Today's project if off the page and on a piece of useful storage that I aged with Stamperia images and crackle paste. 


As is usual in Ikea, I bought on a whim what they call a desk organiser (Tjena series), without an exact idea of how I was going to use it. Because there is a lot of space to decorate (all the boxes side by side measure  18 x 17 cms) I chose to use rice paper collage instead of painting several coats of primer, paints and varnish as that takes a lot of time. 

I always pick up a few sheets of rice paper from the Stamperia collections, again without a project in mind,  just because I like the look of them. (not helping with the overflowing stash situation!!!)
Anyway, perfect time to actually use them! 


Once cut to size I applied DecoArt Decou-Page Matte to the boxes, laid the paper on top and applied another coat of the glue on top, After drying I used a knife to spread a thin coat of Ranger Crackle Paste (transparent). I let the paste dry naturally as the crackle is supposed to more pronounced that way. Then it's a matter of painting a glaze (I used DecoArt Fluid Acrylic Raw Umber) over the whole project, a bit at a time, and wiping the excess off to show off the crackles.

Finally to protect the finish I applied 2 coats of varnish (DecoArt Ultra Matte Varnish).


Your turn to create a Vintage inspired make and link up to the Country View Challenge for the chance to win a £20 voucher for the Country View Craft shop. I can't wait to see what you will make!

Thanks for coming by,

 Craftyfield     I am entering the SSS Wednesday challenge

Thursday, 1 June 2023

Inspired by Tim Holtz

June Vintage 1 st post

Welcome to June and a new Country View Challenge, which I have the pleasure of hosting! 
Regular followers will know I have a thing about Vintage so, yes, this is my choice of theme for this month. 

And today I have not one but TWO inspiration makes for you, both with lots of Tim Holtz products since he is very much a master of the genre! 

Here's the first: 


I started with a blank piece of 7"x5" cardstock and stamped the Stampers Anonymous/Tim Holtz Exquisite Stamp Set (CMS453) in a light sand colour. 

I used pencils to colour the image and stencilled the Stampers Anonymous/Tim Holtz mini stencil set 10 (MST010) with green ink. 

I then aged my page with Distress inks in a combination of Walnut Stain and Antique Linen. 

I stamped bits of the text (also CMS453 stamp set) in the background.

The embellishment cluster is composed of several items from the Tim Holtz® Idea-ology™ - Ephemera Field Notes Snippets (TH94049), a paper doll, bits of paper ribbon lace (Lakeland) and a frame highlighted with metallic waxes.

************
My second make is much brighter but the imagery is still very  much Vintage:


The tag base is a sturdy piece of white Mixed Media cardstock onto which I collaged pieces of Tim Holtz® Idea-ology™ Botanical Collage Paper (TH93705).

I stencilled some Ranger Texture paste (transparent matte) through a bit of die-cut cardstock (I used an old Memory Box die).
I sprayed the tag with a combination of Distress and Distress Oxides sprays and sprinkled some Brushos as well.


When dry, I added colour with Distress crayons to the leaves and flower and darkened the edges with Walnut Stain ink.

Finally the focal point is made of the TH/Idea-ology Ephemera Field Notes Snippets (TH94049), a paper doll and die-cuts from the Sizzix Thinlits Die Set 5PK Wildflower Stems #2.

A spattering of white acrylic paint, some Nuvo drops pearls and voila.. 


Your turn to create a make with a Vintage feel, photos and stamps from olden times, Victoriana, steampunk... pretty much anything pre 1900's will do, and link up your project to the Country View Challenge for the chance to win a £20 voucher for the Country View Craft shop.

Thanks for coming by,

 Craftyfield     I am entering the tag in the Allsorts challenge and both makes in                                                                 the  SSS Wednesday challenge 

Wednesday, 24 May 2023

Mail Art page

Over the last year, my faithful  readers might have noticed a marked dip in the number of my posts which matched the lack of crafting... As things return to normal, slowly, I spotted the Mail Art call from Victoria. I have never done Mail Art before but as I have plenty of postmarks and postal imagery stamps, I felt it was a good opportunity to get me back in the swing of things. 
All the details are on the Paper Artsy blog and you can spot all the art under the #PaperArtsyMailArt tag on Instagram and Facebook

Our contributions will join Victoria's Vintage journal and we will get back a piece of her Mail Art. 


The background is Infusions (Rocky road) and Brushos (Aquamarine, Moss green) and some Antique Linen Distress ink to add an aged look to the piece.  

Most of the stamps are from Paper Artsy: ID02 (Owl), HP1111(Phrases), ELB33 (Corner) and HP1110 (Chambord Castle).

The miniature postcard has been created with several partially stamped images from MN30 (the writing) and other stamps from my collection.

I really enjoyed this project, using some of my favourite (oldies) stamps and the idea of rejoining the crafting community. 


Thanks for coming by,

 Craftyfield   I am entering the Allsorts (it's their Birthday!) and SSS Monday                                                                  challenges

Friday, 19 May 2023

All aboard

Today I have more inspiration for you for our May Country View Challenge,
where the theme chosen by Monika is "Vehicles". 
I had to use that old train stamp by Katzelkraft (set KTZ 86), it has all the qualities I love:
it's Vintage and realistic with very fine details. 


Using my stamping platform I first stamped the train image with Distress inks (Chipped Sapphire and Walnut Stain) spritzed with water. When dry,  I over-stamped the first image with Versafine black ink to add these very fine details that brings it to life.

I added sky, clouds and grass with Distress inks and a sentiment from my own stamp collection.

Your turn to create a Vehicles inspired project and link up your project to the Country View Challenge for the chance to win a £20 voucher for the Country View Craft shop,
but don't miss the train... less than 2 weeks to play!


Thanks for coming by,

 Craftyfield     I am entering the Allsorts, Stamping Sensations and
                                                      We Love Stamping challenges

Monday, 1 May 2023

Eventful Journey

Happy 1st of May! 
For those of us having a bank holiday it might be the opportunity to fit in more crafting in the week and maybe enter our new Country View Challenge, hosted this month by Monika
She has chosen "Vehicles" as the theme and my first project features an old car:


I made the background with several layers of acrylic paint (a mix of PaperArtsy and Cosmic Shimmer matt paints) using a brayer and Distress foam. I added a brick wall (from Tim Holtz Mini Layering Stencil Set 28) and splodges (fromTim Holtz Mini Layering Stencil Set 43). 

I stamped the old car image (from the Stampers Anonymous set CMS021) in black Versafine. Sadly I lost some of the detail of the stamp because of the texture of the paper... hey ho as Tim (Holtz) says "you get what you get and you don't throw a fit". 
 I didn't and I hope you won't either! 

Talking of accidents... I had a major one with a bottle of Nuvo Drops (A Tonic Studio product). Even though the bottle was almost unused the product had dried at the top and couldn't come out of the very small opening. But I was on a mission, so I squeezed and I squeezed... lo and behold the bottle exploded, propulsing paste on the walls, table and even my hair. You've been warned...

I did save the little blob I had planned to add to my left hand corner wheel but the rest of the (broken) bottle went into the bin.

I added the cogs from the Sizzix/Tim Holtz Bigz L die - Mechanicals (665225) and the words from the Sizzix Thinlits Adventure Words set by Tim Holtz as embellishments.

The sentiment is also from the CMS021 stamp set.

Plenty of inspiration on the blog from my teamies so I hope you will join us and link your Vehicle projects to the Country View Challenge for the chance to win a £20 voucher for the Country View Craft shop. 

Thanks for coming by,

 Craftyfield     I am entering the SSS Wednesday challenge

Sunday, 23 April 2023

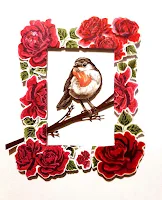
Frame of roses

Welcome to my second inspiration post for our Country View Challenges, hosted this month by Rachel who chose "Things with Wings" as the theme. 

This time I chose a real winged creature, inspired by a floating frame of flowers and leaves. 


To make it I die-cut and stamped many roses from the The Sweet Life Stamp and Dies Sets from Papertrey Ink set (quite old BTW). 


Then on a piece of cardstock the size of the finished card I placed my blooms until they created a pleasing effect, like this: 


Now I placed a rectangle die in the middle to create an aperture and lifted everything using sticky paper (removable) and run the sandwich through the die-cutting machine. [Country View Crafts stock a masking paper which is great for that.] 
Before removing the paper I put foam pads all around the roses making sure all the die-cuts had a bit of foam and enough so that the frame would be stable. 
Time to turn to the focal point, Pip, a freebie from the Papercrafter magazine issue 183, by Two Red Robins. 

The freebie robin had a die and its own stamp, but, would you believe it, unmatched, since they were mirror images of each other and therefore quite unusable!

So, I went in search of a printed Pip on their website and found a Black and white freebie file. With a bit of image manipulation I printed him in different shades so I could with pencils colour him as I wanted.


I got Pip a branch to stand on, part of the Sizzix Thinlits Die Set 20PK - Christmas Shadow Box by Courtney Chilson and placed both behind the frame, before adhering the card base to the frame and bird. I quite liked it like that with flowers uncut on the outside but reasoned that it would be a better look for a wall display than a card, since I still had to put it in an envelope...

With a pair of scissors I simply cut the overhang following the shape of the card and voilà a standard card size again!

I am thinking of several versions of this one, with different stamps and dies as frame... Watch this space.


Your turn to create a project with Winged creatures and link up your project to the Country View Challenges for the chance to win a £20 voucher for the Country View Craft shop.


Thanks for coming by,

 Craftyfield     I am entering the SSS Monday, We Love Stamping
                                                        Stamping  Sensations and Allsorts challenges

Thursday, 13 April 2023

CASe of wine

For the first time in a long time I have been able to make more than 2 projects a month!

Starting with a CAS card that is part of a series of 10  I am making for a gift. 
I will be adding envelopes, tags and will also make a box to present them.  


I have used Visible Image 99% Chance of Wine stamp and die sets for this card. 

The 2 glasses at the front are die-cut the others stamped directly on the base card, using grey and maroon inks. 

I added colour to the cork and a "table" under my glasses with pencils and the sentiment has been printed on the card. The other half of this funny quote is revealed on the inside page: 


Thanks for coming by, Cheers!

 Craftyfield      I am entering the Allsorts, Stamping Sensations, and                                                                                    We Love Stamping challenges

Saturday, 1 April 2023

Spring gives you wings

April is the month when the weather starts to be interesting over here, well warmer anyhow! I feel the sun rays cheer me up and give me wings... And Things with Wings is the theme chosen by Rachel for our Country View Challenges. So birds, bees, butterflies and faeries are all welcome!

I started with fairie:


All stamps are from Lavinia.
I stamped and masked the moon (LAV431) before applying Distress inks for the background. I also added paper masks for the hills.
Next I stamped the Open Dandelions (LAV 745) et and the faerie (Mia) and to finish I repeat stamped the Oak Leaf (LAV760) and embossed Stars Mini (LAV152) with WOW! Embossing Glitter - White Twinkle.

I matted the image on black and orange cardstock and left the sentiment for the inside of the card!
 
Your turn to create a Birthday card for men and link up your project to the Country View Challenge for the chance to win a £20 voucher for the Country View Craft shop.

Thanks for coming by,

 Craftyfield     I am entering the SSS Wednesday and Allsorts challenges

Wednesday, 15 March 2023

Birthday Card for a man

Today I am showing my second inspiration piece for the Country View Challenge, where the theme is "Birthday card for a man", chosen by Corrie. I went with drinks which is more neutral than masculine but this one IS for a man so... 


I stamped the glass at the front first and masked it, stamping the bottle and the second glass over it using grey and blue inks. I added the spray from the ice cube hitting the drink in various shades of blue.
I coloured the ice cubes, glasses, lemon and bottle with pencils and stamped the words in black.

The sentiment "It's Your Special Day" is from the Essentials Sentiments set SYC007 from Sentimentally Yours.

All the other stamps are from Visible image, most from the Keep your Gin up set with the "today's forecast..." borrowed from the 99% Chance of Wine set.

Your turn to create a Birthday card for a man and link up your project to the Country View Challenge for the chance to win a £20 voucher for the Country View Craft shop.

Thanks for coming by,

Craftyfield           I am entering the SSS Monday ChallengeAllsorts
                                                       We Love Stamping,  and Stamping Sensations challenges


Wednesday, 1 March 2023

Happy Birthday Handsome

Welcome to March and a new Country View Challenge, hosted this month by Corrie who has chosen " Birthday card for men" as the theme. Yes those difficult cards to make... but, no fear ,the DT has plenty of ideas on the blog! 

My first card is one for a young man, I'd call him a teenager but that time has passed! 


I pulled out a masculine collection, Mr Handsome and the Young and Free, both by Craft O'Clock . I had planned to use stamps and/or stencils as well but the papers did the job all on their own. 

I did, however, use a few dies to spice up the design, including the Birthday sentiments (Happy from the One Liners: Happy Die set and from Wonderful Words: Birthday Die, both from Papertrey ink.
From MFT Die-namics I used the Notebook Edge. 

[I am looking at old stash a lot recently and feeling nostalgic about the supplies we could get from the US before it cost an arm and a leg to ship over the pond...] 

Anyhoo... have a look at what the DT made on the Country View Challenge blog and link up your project to the challenge for the chance to win a £20 voucher for the Country View Craft shop. Just remember to follow the rules!!! 

Thanks for coming by,

 Craftyfield    I am entering the Allsorts and SSS Wednesday challenges 

Thursday, 9 February 2023

Winter sentiment

No this is not an old post... Untypically for me I have started Christmas crafting early... well last year I hardly had any time to craft, resorting to actually BUYING some cards! 

This card fits our Country View Challenge blog where the theme is "Be Sentimental" (not just romance but any sentiment, phrase or inspirational quote): 


I just had to test some of the supplies I grabbed during the fabulous Advent Calendar sales at Country View Crafts (if you've never heard of it before, Susan does a special offer from the 1st to the 24th of December). 
I die-cut the Paper Panda Craft Die - Meadow Frame (Creative Expressions) and used the inside oval as a shield to my brushos when I created the background. The paper I used for the die-cut is a specialty Self adhesive paper, thin enough that it will die-cut without too many passes. This is a game changer for these detailed dies and at less than £10 for 25 sheets a bargain to boot! 
When that dried I simply stamped the Sentiment (STAMPlorations) in Versafine Black. 

Then I peeled off the backing of my die-cut and applied to the background before sticking both onto my base card. 
I am so pleased the stamp fits so well in that frame and I am planning a series so I will not be caught out without hand made cards next Christmas... 


Over to you now, visit the Country View Challenge blog for more inspiration, the DT posts every other day for the first 3 weeks. and join us by linking  your project here for the chance to win a £20 voucher for the Country View Craft shop, just make sure you follow the rules!


Thanks for coming by,

 Craftyfield   I am entering the Allsorts (I love playing with new supplies...),   
  Stamping Sensations and SSS Wednesday challenges                                

Wednesday, 1 February 2023

Valentine's card - Together

Happy day! Today is the day of our new Country View Challenge, hosted this month by Jane who has chosen "Be Sentimental" as this month's theme.
Of course we expect to see lots of Valentine's cards but the main thing is to have a sentiment, a phrase or some inspiring words... so quite a lot of options.

For my Valentine card I used quite a few oldies:


First I cut a piece of masking tape the same size as my base card: 6"x6" and stamped the heart (Papermania Sew Lovely - part of a magazine freebie I believe and probably 10 years old...) on it. I then cut it out, keeping both innie (the heart) and outie to use later.

I left the heart stamp on the stamping platform so I was sure to have the stamp in the right place when I came to stamp it on the base card.

I positioned the outie on my base card and stamped a texture through the heart opening, here a Create A Card stamp by Impression Obsession with a canvas texture.


Then I stamped the heart on the base card, phew perfect placement!

I positioned the innie onto the base card to make sure the sentiment I was going to stamp was in the right place and straight... When happy I took the heart mask off and stamped on the base card.


I added a background with a stencil from the Mini Stencil Set THMST010 (Stampers Anonymous/Tim Holtz) and some Distress inks.
Finally I added some other words as some sort of embellishments, both by Rubber Dance, the quote by Josiah Holland and the "Always" from a very well liked Nostalgic Couples set and the Together from the Beautiful Words set.

This is taking me back to stamping at its best and, if the object of your affection is far away, perfect for posting as it is absolutely flat with no added weight!


Over to you now, have a look at what the DT made on the Country View Challenge blog and link up your project to the challenge for the chance to win a £20 voucher for the Country View Craft shop, just make sure you follow ALL the rules (they aren't that many...)


Thanks for coming by,

 Craftyfield   I am entering the SSS Wednesday challenge