Sunday, 8 November 2020

X-mas Tag-a-thon 2020 edition


Well, I don't know where the time goes... I should have more on my hands since this week's lockdown but no, the days just seem to evaporate without much being achieved.
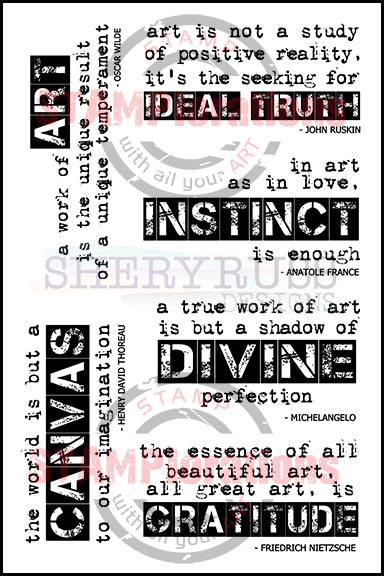
Still I managed to ink up this lovely stamp  (CI- 503) by Crafty Individuals and made a set of tags. In fact -for the benefit of Vintage Journey- a TRIO of PAIRS (see what I did there...) .

First up, basic stamping with black ink, I used Memento on the left and Versafine on the right and the Versafine is really a better image although a touch too dark because my pad is still new and very juicy:


 Next, I used Versafine in Pinecone and Shady Lane on kraft coloured cardstock and embossed the sentiment in white. 


 Finally, my favourite look, the multi-coloured stamping. I won't lie, this took me ages to stamp and halfway through I was regretting it, but to me it shows off the details of the stamp beautifully. I used water based markers and Indian ink markers (Faber Castell Big Brush) to ink the stamps. 


  After my first stamping,  I spritzed the stamps with water to see if I could get another print and got this pleasing result on smooth watercolour card: 

I have been toying with the idea of doing another batch and adding colour with either pencils or markers but it will keep for another session. In the meantime, I need to create a pocket for these tags so I can gift them. Any suggestions gratefully received!

Thanks for coming by,
I am also entering the SSS Monday, Allsorts,  and We Love Chocolate Baroque challenges.

Sunday, 1 November 2020

Clean and simple World


Today we are kicking of new challenges at STAMPlorations, mine is the Theme and Photo Prompt which is:

I chose to follow the Black & White colour scheme of the photo prompt as it also happens to be the starkest of colour contrasts.
I built up the image with several stamps from Art Marks, Art is and Born to Roam sets, using Black Versafine for the best detail. 

And... well that's it really, couldn't be simpler!

The STAMP girls are showing inspiration on the STAMPlorations blog so pop by and don't forget to enter our Theme and Photo Prompt challenge.

***
Whenever you shop for STAMPlorations products you can get 20% off with my code: STAMPGIRLCRAFTY

***

Thanks for coming by,
I am entering the SSS Wednesday challenges.


Experiment in foiling

Only a few weeks to go before Christmas! You must all be fed up with making cards, no? 
Well, if you are, relax, our Country View Challenge, which this month is hosted by Jane, is "Not a card". 


I created a Masterboard with Fresco paints and stamped motifs from two Paper Artsy sets (ELB33, EEV06).
I had in mind testing hot foiling with stamped images and used 2 techniques on my Masterboard. The leaves were embossed with Frosted Crystal EP (Ranger Antiquities) and the wheat grass and has been stamped with gel medium before foiling.

These 2 techniques,  EP+foiling and stamped gel medium+foiling give VERY different results....


On the left before foiling, the stamped image have a lot of detail but after foiling the one that has been embossed is almost a solid image whilst the wheatgrass and leaf stamped with gel medium is barely visible.

So there you are both methods tested for you... 
If you want a better result, fear not as Country View Crafts is now stocking the latest tools from Heidi Swapp to stamp/write & foil
 

Over to you now, have a look at what the DT made on the Country View Challenge blog and link up your project to the challenge for the chance to win a £20 voucher for the Country View Craft shop.

Thanks for coming by,
I am entering the SSS Wednesday and Paperbabe challenges.


Friday, 23 October 2020

7th Anniversary Day 5 Targeted

Today is the last day of our STAMPlorations 7th Birthday Celebrations 


I wanted to use the newly released Circles Flexi-Template and couldn't get this picture of a target out of my mind. With Thanksgiving around the corner I thought of these poor birds being lined up for dinner...

And, if you are follower of my blog, you will have noticed I love my Birds of Paradise, which I find so easy to place in humorous situations. (check this one out, it still makes me smile!)


To make it easy for myself I sprayed the back of the templates with temporary adhesive and pieces of washi tape on the front to keep them together for placement.

I first took out the largest ring and used blue ink through the space. I then cleaned the stencil, leaving it in place and replaced the circle on top of the blue ink.


Then I took the next but one ring out and used red ink:


Again I cleaned the stencil before replacing the ring and inking through the last circle with blue.   
The border is stencilled with the new ARTplorations Slimline stencil Stitchings and Carved Pumpkin Distress inks. Yes our bird has been properly stitched up!


The STAMP girls are showing their makes on the STAMPlorations blog so pop by and don't forget to comment along the way for a chance to win (before the 8th of November)!

***
Whenever you shop for STAMPlorations products you can get 20% off with my code: STAMPGIRLCRAFTY 
AND during the Anniversary all orders placed with my code will include this not-yet-released stencil, Just Plaid square stencil (10 mil):

***

I hope you have enjoyed all the inspiration and new products the STAMP girls showed all week! Maybe you will also join the Linky parties under way...

As always, thanks for visiting,


Thursday, 22 October 2020

7th Anniversary Day 4 Fall Leaves

Welcome to Day 4 of our STAMPlorations Birthday's celebrations !


The russets, yellows and brown of Autumn go so well with gold that I wanted to add some foiling in my make. One of the easiest way is with a stencil, some acrylic medium (this can be matte or gloss) foil and either a foiling machine or a laminator.


 I started with a manilla tag and applied  Fresco paints (Paper Artsy) roughly to the tag, spreading with a brayer. I then applied paints through the Leaf Prints 3 stencil and layered some acrylic medium on top here and there for the foiling process.

To foil I just sandwich the foil and the tag in a folded piece of paper, and run it through the laminator.

For my focal point, I stamped some leaves from the Trendy Leaves set inked with several colours of dye inks and fussy cut them. I shaped them and popped them on foam pads to add dimension and placed them on a piece of doily. 

Finally I added a Dymo label and a Nuvo Drop finish. 

A closer look at the shine from the foil...


***
The STAMP girls are showing inspiration for all the challenges on the STAMPlorations blog so pop by and don't forget to comment along the way for a chance to win (before the 8th of November)!

***
Whenever you shop for STAMPlorations products you can get 20% off with my code: STAMPGIRLCRAFTY 
AND during the Anniversary all orders placed with my code will include this not-yet-released stencil, Just Plaid square stencil (10 mil):

***


Thanks for coming by,


Wednesday, 21 October 2020

7th Anniversary Day 3 I have this one sewn up

Welcome to our 3rd day of STAMPlorations Birthday's celebration.


Today I am road testing the Circles all over Cover plate.


As soon as I saw it I thought Stitching... 

I die-cut the cover plate out of orange cardstock, using a standard die-cutting sandwich NOT embossing sandwich, since I wanted to go though the holes with a needle and mere embossing just imprints the texture.

I used a multicoloured metallic thread to create the designs. It's very simple to do, but quite time consuming, especially if you are an inexperienced sewer like me!

My focal point is the negative  Art Happens die-cut into black card and inlaid with the positive die cut from another piece of card inked in orange and purple.

***
The STAMP girls are showing inspiration on the STAMPlorations blog so pop by and don't forget to comment along the way for a chance to win. (before the 8th of November)!

***
Whenever you shop for STAMPlorations products you can get 20% off with my code: STAMPGIRLCRAFTY 
AND during the Anniversary all orders placed with my code will include this not-yet-released stencil, Just Plaid square stencil (10 mil):

***

Thanks for coming by,


Tuesday, 20 October 2020

7th Anniversary Day 2 Forever Roses

Welcome back for our 2nd day of STAMPlorations Birthday Celebration 


Unusually, today I have a card with with patterned papers! I used the Basic A2 Panels Nesting Dies to cut quickly and easily a few pieces and layering them simply on my base card.


The focal image is from the Bloomfully: Forever stamp set, recently released.  I stamped it with Distress inks in pale pink and Antique Linen for the leaves to get a no-line colouring look.
 
I then used watercolours and a brush for the roses and added a stamped sentiment from the same set.

***

The STAMP girls are showing inspiration for all the challenges on the STAMPlorations blog so pop by and don't forget to comment along the way for a chance to win (before the 8th of November)!

You can see all of the new sets released here    


***
Whenever you shop for STAMPlorations products you can get 20% off with my code: STAMPGIRLCRAFTY 
AND during the Anniversary all orders placed with my code will include this not-yet-released stencil, Just Plaid square stencil (10 mil):

***

Thanks for coming by,
I am entering the challenges.


Monday, 19 October 2020

7th Anniversary Autumn trees & Latte

Welcome to the first day of  STAMPlorations 7th Birthday celebrations
A bit later than usual, due to Covid19, but every bit as good as previous years and I think even better !


Today I have a slimline card for you. Slimline cards have seen a sudden surge of popularity across the pond and manufacturers have responded with designs adapted to this format. The 8.5" x 3.5"fits the US business envelope and uses the whole width of the standard US paper size. 

I have tweaked my measurements to European size A4,  cutting the sheet of card to roughly 6"1/2 lengthwise and keeping the whole portrait width, giving a folded size of 8" by 3"1/4 (or 21x 8.9cms). Slightly smaller than the stencil and less wide than the DL envelope but still OK.
 
 
To make it I first used some Distress inks to establish a sky and grass background.
 

Then I placed the Trees – ARTplorations Slimline stencil on top and used Distress Oxides with a sponge. DOs are much more opaque than DIs and I needed this property to show up against the green of the grass!

 
Tip: to counteract the green of the grass I used Violet first and then Walnut ink.
To finish I used white gel pen over the small lines of the trees to hide the background colour.

The sentiment from the Better Than Autumn set has been inked with a Kaleidacolor ink pad and stamped on glossy card. I added 2 leaf brads and mounted it on foam pads .

 ***
The STAMP girls are showing inspiration for all the challenges on the STAMPlorations blog so pop by and don't forget to comment along the way for a chance to win (before the 8th of November)!

***
Whenever you shop for STAMPlorations products you can get 20% off with my code: STAMPGIRLCRAFTY 
AND during the Anniversary all orders placed with my code will include this not-yet-released stencil, Just Plaid square stencil (10 mil):

***

Do come by tomorrow for more inspiration as the celebration continues....