Friday, 3 November 2017

Amost Halloween bird tag

Today is the first day of a new Theme & Sketch challenge at Stamplorations.

The theme and sketch are:


I chose to go with the theme and, since Halloween was only a few days ago, I made a tag using the orange and violet colours usually associated with the event.....


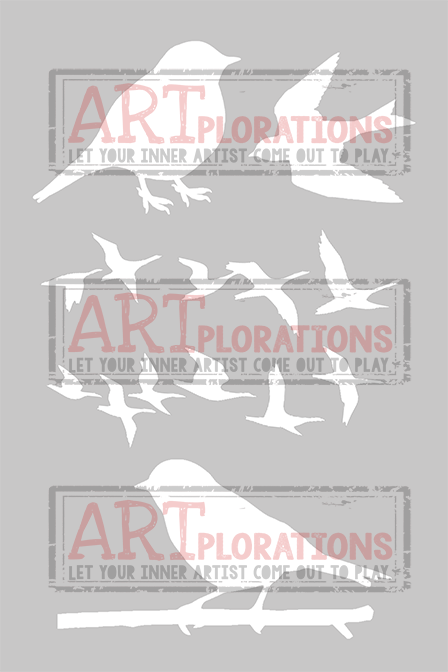
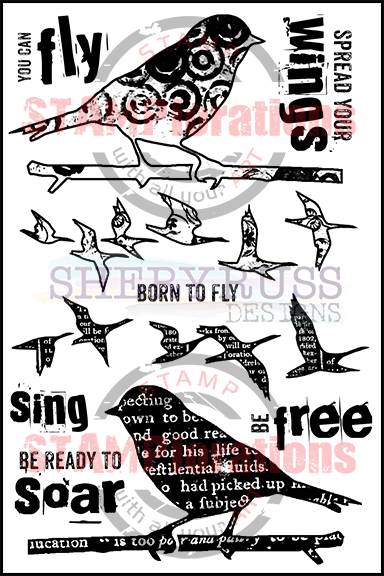
Did you notice that the ARTplorations Stencil Some Birds has the same motifs as the Trendy Birds 2 stamp set? When I did, I immediately saw the opportunities available when combining them. Furthermore, the stencil comes with both the positive and negative shapes so you get the mask AND the stencil for even more possibilities!

For this tag I used the bird mask and applied it on the cardstock with removable adhesive. I sponged Distress inks, both regular and Oxides to the whole tag.

Replacing the mask with the stencil, I coloured the bird with Distress ink in Wilted violet.

I kept the stencil attached in case I needed to apply further colour and proceded to stamp the bird with a combination of Salty Ocean and Wilted violet Distress Oxides.

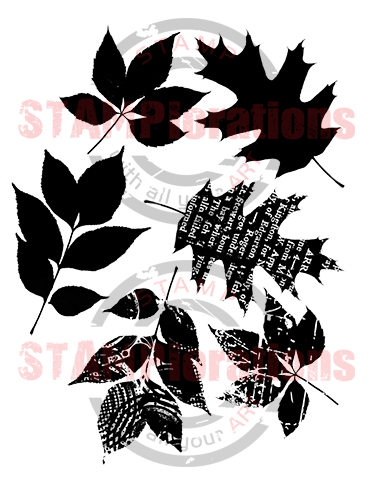
I stamped a sentiment from the same set and added two leaves from the Trendy Leaves set, stamped with dye inks.

Hop on over to the Stamplorations blog for more inspiration from my teamies and do join us in our Theme & Sketch Challenge.
If you do, you might win a lovely Stamplorations prize...

Thanks for coming by,
I am entering the Craft Stamper TIMI, SSS Monday Challenge, Addicted to stamps and Inkychicks challenges.


Wednesday, 1 November 2017

Inspired by travel

New month, new challenge at Country View Crafts, where the theme is Stencils, hosted by Gabrielle.

Lots of scope with this theme so I decided to make a journal page and experiment.


On the left hand page I used the stencils with acrylic paints, applied with a piece of Distress foam.


On the right I used a technique akin to brass rubbings. The pages of my journal being fairly lightweight, even after a coat of gesso, this technique  still works with a thin stencil like this.

To take the "rubbing" I hold the coloured pencil very flat against the page, pressing quite firmly and the design appears as by magic! (my inner child had lots of fun with this...)


In the next step, I added washes of acrylic paints in yellow, orange and magenta (DecoArt) across the page and, with a sponge, added black paint all around to frame the pages.

Onto the stamping... I have many stamps related to travel, here I used Rubber Dance Globe map, La Mappa, Venezia and Vintage Hotel receipt  which have been added to the Country View Crafts shop. I used a variety of ink colours to give an impression of faded ink.

Finally, I couldn't help but throw in some die-cut words from the Adventure and Vacation WordsThinlits by Tim Holtz/Sizzix.

I hope I have inspired you to join in our challenge, remember there's a £20 Country View Crafts voucher for grabs, so crack out the stencils and start crafting!

Thanks for coming by,
 I am entering the Rubber Dance Forever challenge.

Sunday, 29 October 2017

Botanical

Just enough time to squeeze in another pearlescent make in the Paper Artsy challenge, still inspired by Alison/Craftytrog (you can read her post : here), this one with a more Vintage look.


I used Paper Artsy ELB33 for the background motifs and the central flower is by Rubber Dance from the Antique Botanicals set.
I had to emboss with clear EP all of the stamping, as I found out that the ink I used just wouldn't dry on the pearlescent glaze!


Difficult to capture the shine, especially in artificial light (and with a phone camera instead of my trusty traditional camera) but here goes, the "Shine" shot:

As my followers are probably sick of the sight of my posts, I promise no more posts until the 1st of November...


Also entering the That's Crafty and SSS Wednesday challenges.

Black & White

I did warn you there'd  be more posts this weekend...

Still working with Alison/Craftytrog techniques for the Paper Artsy challenge (her post : here), I tried a different version in a monochrome colour scheme for a manly feel:


The stamps I used are from the HP1008 set and a crakle motif (Crafty Individuals) to supplement the feeble crackles I got from the paint.

And of course, tilt the board to the light and hey presto, pearlescence...


Have a great Sunday!


Also entering the SSS Monday, Fashionable Stamping ans SSS Wednesday challenges.

Saturday, 28 October 2017

Flower and leaves

This could be one of many posts... Don't feel guilty for not commenting on all posts coming up this weekend, as I know you're all very busy!

I have been inspired by Alison/Craftytrog who made an inspiration piece for the Paper Artsy challenge. You can find all the details here.


I followed Alison technique quite closely so I won't bore you with the details, I 'll just mention the stamps I used, a flower from the HP1111 and the leaves from ELB33.
 
And since the challenge theme is pearlescent, I should try and show you a bit  of that shine, which doesn't come out very well under artificial lighting.


See you soon,
Also entering the That's Crafty and SSS Wednesday challenges .

Thursday, 26 October 2017

Iconic

The wooden hinged diptychs remind me of Byzantine icons and this is the inspiration for my Craft Barn DT post today.


The past, and present face each other on the inside:


I used several techniques to give an aged look to my diptych and you can read all the details on the Craft Barn blog.

Supplies:
Hinged wooden icon
Gesso
Paper Artsy stamps from LCP02 and HP1008
Brilliance ink in Graphite Black
DecoArt and Paper Artsy Fresco paints
Mini layering stencils TH010
Gilding wax
Crackle medium

Thanks for coming by,
I am entering the SSS Wednesday, Creative Artiste challenges.

Saturday, 21 October 2017

Fauxdori inserts

Today on the Craft Barn blog I'm showing how to create some inserts for your Midori (Fauxdori). I did a step by step for the cover last month which you can see here.

Some pics to whet your appetite:


Come and find out on the Craft Barn blog how I did these and other inserts, plus a lot more pics...
Warning you might need to get a cup of your favourit beverage at hand, this is a long post!

Thanks for coming by,
I am showing my make to the Mini Album Makers, as it completes last month's album, which did make the Top 5 BTW...

Friday, 20 October 2017

Flowers along the path

It's time to show you a second inspiration piece for the Stamplorations Theme and Sketch challenge. If you missed my first post you can find it here.

This month's theme and sketch are:
 

Today I made a card following the theme only and chose blue and violet as my colours.


First I die-cut a length of masking tape with the Stitched Snow Hills - CUTplorations and applied it on the whole card. I created a gradated path from blue to violet with Distress inks.

I stamped flowers from Dee's Artsy Impressions - Smile set, with the masking tape still in place, for my background motifs.

In the foreground, I stamped the calla lily from the same set with black ink after removing the tape. To colour I first retrieved the white of the card with bleach, then used coloured pencils.

The sentiment stamped in black ink from the same stamp set completes the card.

Let's have a look at the whole card front and back:


Hop on over to the Stamplorations blog for more inspirational makes from the DT. You still have 10 days to enter the challenge and you don't need Stamplorations products to enter.

Thanks for coming by,
I am entering the Addicted to stamps, Penny Black and more challenges.


Sunday, 15 October 2017

Fire and Ice

Paper Artsy is having a Glitter fortnight and I have been inspired by Nikki and the fab technique she used on her project and was running out of time to enter the challenge....


I used a double sided adhesive sheet and placed some die-cuts on one side (Diesire - Delicate Swirls Overlay Die) before applying gilding flakes (IndigoBlu Winter Dawn).

On the other side I placed a pine branch die-cut (Impression Obsession Pine Branch), which I had already embellished with embossing powders (White, Aged Aqua - Stampendous, Wow Seaglass).

Tipped half a bottle of fine glitter over it (Art Institute)... Added a sentiment die-cut from black cardstock - I'd planned to emboss it with gold glitter but I felt I had reached the point of TOO MUCH glitter already!

And unusually for me no stamping...

The shining effect is incredible, although in my case, as the glitter is blue, it does interfere with the lovely warm colours of the gilding flakes. A close up and like Nikki I am attempting video:

I would recommend the technique, despite the glitter mess and bits of flakes flying around, well worth it in the end!

Thanks for coming by,
Also entering the Addicted to stamps challenge.

Wednesday, 11 October 2017

Gift for the girls

There is nothing like a hand made gift for the girl that has everything... something with a personal touch and absolutely unique, is the answer for those times when nothing fits the bill.

With a fast approaching Christmas, I constructed and decorated this box from Art-C for a girlfriend to keep her jewellery in, well some of it anyway...


It's an easy project and, having chosen to cover the box entirely with paper, a fairly quick one to make too!

Supplies:
Art-C Masonite Shelf with Drawers kit
Imagination Crafts Rice paper
Scrap of recycled metal die-cut (Spellbinders - Persian accents)
Kaiserkraft stamp
Imagination Crafts: Starlights in Dark Orchid
DecoArt Metallic Lustre Wax Finish - Champagne Ice
Gesso
DecoArt Matte medium
DecoArt Ultra matte varnish

Do come over to the Craft Barn blog for the full step by step.

Thanks for coming by,
I am entering the SSS Monday, Inky Chicks, Creative Artist and Craft Stamper TIMI  challenges.

Saturday, 7 October 2017

A prickly post

Welcome to my second inspiration post for the Country View challenge! The theme is Mixed Media with Autumn colours, chosen by the lovely Rachel.

I hadn't intended this to turn out quite as Mixed Media as it did in the end... a lesson in what NOT to do!!!


The Mixed Media element is the wooden background which started with 2 colours of acrylic paint, scraped on kraft card.

I then applied Grungepaste through a Tim Holtz layered mini stencil (no 10) and sprinkled some powders, scraping over the paste with a palette knife.

Unfortunately there was a lot of white showing from the grungepaste so I decided to add more powders and sprayed water to give an overall wash. Hmm, I overdid it and the piece got really dark...

From then on I threw lots of things at it in the hope of recovery: sanding block, Treasure gold, acrylic paints till I got a reasonable result! In my panic I didn't think to take pictures of my efforts.

The focal image, an irresistible Zentangle hedgehog from Rubber Dance, didn't give me as many problems, although I did choose time consuming techniques to create this image where, unusually for Zentangle, there is no black to be seen...
I made extensive use of my stamping platform to stamp each colour individually, applying in turn waterbased markers to flowers, leaves, bark etc...

I did the colouring with pencils, without the addition of solvents or burnishing pencils.

Some die-cut leaves and a sentiment (Beautiful words by Rubber Dance ) finish off the make.

Thanks for dropping by and having a look, now it's over to you... if you enter our Country View challenge you could win a £20 voucher to spend on some new stash...  I'm looking forward to see what you will make!
I am entering the Creative Artist Mixed Media, Lost Coast Designs, We Love To Create, Rubbernecker, That's Crafty, Rubber Dance Forever, Stamping SensationsPenny Black and more, SSS Monday and Vintage Journey challenges.

Friday, 6 October 2017

Autumn days

The Stamplorations Theme and Sketch challenge is back and to my delight I have been invited for a further 3 months as a Guest designer!

This month's theme and sketch are:

For my first inspiration piece, I used both (entries in the challenge are only required to follow either the Sketch or the Theme) and made this CAS card:


For some reason I was intent on using vellum, so I stamped the leaves from the Trendy Leaves set with a Kaleidacolor inkpad (Autumn Leaves ) and used a piece of blue vellum to matt my focal image, the Better than Autumn stamp . This was also stamped with a Kaleidacolor inkpad,  Blue Breeze this time.

I coloured the image with pencils and added the sentiment from the Better than Autumn set.

Now, I'll share with you my experience with Distress Oxides on this project, the inks I had originally planned to use.
I had stamped the leaves using Distress Oxides onto the blue vellum, thinking that the inks would be opaque and the blue would only show in the script and other details of the stamps. As far as opacity went, yes, the D.O  delivered... BUT... within minutes of drying all I could see was the whitish layer of pigment ink, and none of the bright Fossilized Amber and Fired Brick dyes! I'm guessing this is something to do with the absorbency, or rather lack of, of the vellum. Do share your experiences in the comment, I'd love to understand more.

Digression over, do come by the Stamplorations blog for more inspirational makes from the DT and do enter the challenge! Remember that you don't need Stamplorations products to enter and there are prizes to be won...

I'll be back on the 20th of October for a second inspiration post.

Keep on crafting,
I am entering the Craft Stamper TIMI, Uniko StudioInfiniment Scrap, and Addicted to Stamps challenges.