Wednesday, 26 June 2013

Sea, Sun and B(l)each

After a non existing spring and a seriously lacklustre start of the summer, all I can do is dream of beaches in the sun, so this Crafty Individual challenge is wellcome.
I knew at once the stamp I was going to use and that a paper from the Crafty Individuals background paper book "The seaside" would be involved.


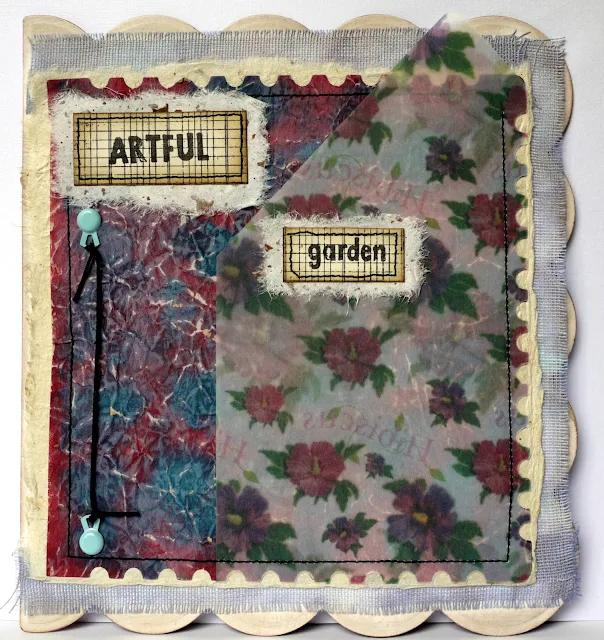
The difficulty I have with designer papers is I loathe covering them, as they are quite beautiful without adding anything, but... it had to be done! I decided to make it my own by adding some stencilling with a spray, distress ink and foil on the upper left corner, as well as stamping in 2 other corners. I like the effect of the Sea shell stamped in Frosted crystal embossing powder peeking out from underneath the printed seashell of the paper on the right hand side.

I stamped the Life's a Beach Girlfriends (CI-284) image on a distress inked background and bleached out the details. The saying is embossed with white powder.
I cut out part of the starfishes and added some gauze to frame the stamped panel.

I quite liked the card at this stage but, was it enough? In the end I enlarged my "canvas" and made it into an 8"x8" card by adding an embossed and sanded sheet of Coredination White wash, which is big for a card, certainly bigger than I have ever done.

Was is it  better as a 6x6 or does the embossed frame enhance the panel ? Please give me your opinion in the comments below.

I am also entering this card in the Ali-Craft blog challenge (open theme).

Sunday, 23 June 2013

Colors of summer

This is the theme of the challenge atImpression Obsession. I chose to make a layout with some vintage photos, involving a summer dress that I imagine in bright colors of red, pink, yellow and blue against a fresh white. Not unlike the small strip of floral print material I stuck on the bottom left of the page.

 
I have used some of my newest IO stamps and dies, the Dress Form Trio (F13086), Tag set (3119-SM) and Flags die set (DIE015-F), Rose Print Background (F8867). The stamped images have been chalked so that the colors would actually be visible on the fairly dark blue background.
The base cardstock has a white core and I took advantage by embossing corners and borders. The mat behind the single dress form (fussy cut) is a Scalloped Nestie that I have punched with a long reach butterfly punch.

Thanks for coming by,


Saturday, 22 June 2013

Inspired By Carol Quance


This week Carol made a lovely tag book and a canvas for the Paper Artsy blog, I was tempted by the book but I couldn't complete it in the time, so I made an embossed tag (see Carol's here) as I thought the effect was fantastic.

After painting my tag in 3 colours of Fresco paint, the background was very bright and not subtle as per Carol's tag but I decided to leave it as I thought it appealing in an abstract way.

I embossed the tag with a small TH embossing folder and a Cuttlebug folder, then set about highlighting the embossing. In the search for an alternative to Treasure Gold I tried mica powders and then applying gold foil. The background was toned down in the process.


To emboss around the tag I used Frantage Aged Rose, the shine is gorgeous as you can see :

I chose to stamp my image, from Hot Pick 1207, on mulberry paper to use old scraps and because I thought it would be more sturdy than ordinary tissue paper when gluing it down (it was).

And as serendipity would have it, the colours through the stamped image and the strands of the mulberry make me think of  a night sky illuminated by fireworks reflecting in water, and I love it !

The photo doesn't give that impression as much but I had to use the flash due to the very dull weather and the fibers of the paper look paler than in real life as they reflect the flash light.

Let me know what you think,


Friday, 14 June 2013

Inspired By France Papillon (2)

This week I was inspired by France's Art journal page, although not having a journal myself, I made some alterations and produced a page for my samples book (still in progress).

For stencil I used the one I made last week to see how it would perform with a resist technique and for good measure created another one for the butterfly 3D embellishment (also with a die). I had several problems with that, probably because I used standard texture paste instead of Grungepaste and it isn't flexible and prone to breakage, which of course it did ! I also added glitter to the paste and Fresco paint to tint.

The main image is from Paper Artsy Hotpick 1206.
I used Dymo tape for the words (use my stash drive), you can see that it has become recalcitrant and is liable to emboss one letter over the next one. But then it adds to the distressed look, right ?

The mat behind the image is from a "Gelli plate" print I made earlier.- I use a pastry silicone mat in lieu of a Gelli plate -

If you're inspired by France you can still enter at the Paper Artsy blog.

Hope you will like this...

Wednesday, 12 June 2013

Sew Special

Before I talk about this project, I would like to draw your attention to the right hand side column of my blog. Yesss!!!! I have won the Top 3 Merit award for my May entry in the Country View Craft Challenge. I know this is a small achievement (Tim Holtz needn't be worried), yet I am over the moon:Dand inordinately proud. Plus, I get to make an appearance as Guest Designer next month ! Hope my offering will be up to par...

But enough showing off, June is the month for die-cuts at Country View Crafts so I created a card with plenty of die-cuts from 3 different brands.
I created the background on glossy cardstock using the resist technique with an Impression Obsession stamp.
The "Sew special" letters have been cut with dies (Die-namics) from shrink plastic and lightly colored with alcohol pens (not obvious from the photo). I also punched 2 holes at the top of the letters in order to thread some twine, but after shrinking I realised my holes were a bit small and I used thin wire instead. I used the negative shapes for the I and the L so I could thread them in the same way as the others.
The scissors and thimble have been distressed with black alcohol ink.
The dress is an image transfer from patterned paper on white material, seen from the material side and therefore a lot paler than the original paper.

I am also entering this card in the My Mum's Craft Shop challenge - Dies, Dies, Dies

I used lots of techniques and materials and I quite enjoyed myself making this card !

This one is for the men.....

With Father's day coming up and men always so difficult to craft for, I had to get on and make something without delay. Fortunately, I already had a starting point, in the shape of an embossing folder with a clocks design (ideal for a clock-mad father).


I die-cut a shape out of metal and inked the folder with versamark before running it through the die-cutting machine. The first layer of embossing powder is Frantage Aged Aqua. Then I highlighted some clocks with black embossing powder and some with gold.
Whilst the stamping takes a second place on this card, I used no fewer than 5 stamps for the ticket and tag flag die-cuts : the clock and "time to celebrate" are from the Craft Stamper magazine, the sentiment is one of my own, for texture I used the Grunge stamp and the tag flag die's matching stamp (I used the kissing technique with this one), both from Impression Obsession. A bit of twine, distress inked edges and a black mat finish the card.

I am entering this card in the following challenges:
Artistic Stamper - Makes for men
Ladybug Crafts - For the men in your life
Lexi's Creations Challenge #92 - Father's Day or Special Male Birthday
Lisa B Designs - Those magnificent men

Thanks for coming by,

Sunday, 9 June 2013

Bloom where you are planted

This is the theme for the Impression Obession Challenge this week, and offers me the opportunity to make a card I have had in mind for quite a while... and it's all about using some Flower Soft : I love it, but hardly ever use it. I have 2 crafty resolutions for the year : 1- use old stash, 2- use scraps of paper/cardstock and I have kept those rules in mind when designing this card.


The background is Core'dination (White wash) embossed with a freebie folder from a magazine, that I stamped beforehand with CAC Grunge (CC076).
The main image is Flower Wheelbarrow (D1312) , colored with alcohol markers and jazzed up with the Flower Soft. I created a frame around it with punched shapes, managing to tick both resolutions in one go ! Old tools with scraps... perfect. I must own up that this idea has been ...hmm, "borrowed" from Shona, as I saw it in a previous IO challenge. Hope she won't mind.

Finally I felt there was something missing and pulled out the rhinestones, another tick on my "old stash" resolution !

Thanks for coming by,

Friday, 7 June 2013

Inspired By Sue Carrington (2)

Sue returns to the Paper Arsty blog and I have taken inspiration, mainly, from her sewing box project. But I didn't have a wooden box to play with... what I DID have is a box, where I store my embossing powders. You'll see that I have only done the box lid, but mine is considerably larger than Sue's box. Not sure if I will paint the other half as I want to be able to close it !


I embossed some metal with a Ten Seconds Studio mould and applied Fresco paints, then highlighted them with wax crayons. This is in place of Treasure Gold, which is on my wish list but not yet in my stash.
I affixed the metal with texture paste to the box (so that the embossing doesn't get flattened) and painted it with 3 colours of Fresco in thin layers.
The background stamps are from the Hot Picks sets 1111, 1201 and 1202 also stamped with paints and the main image, stamped in Archival black, is from the Hot pick 1112.
Then, I HAD to use my latest home made stencil, a quatrefoil design. The paint seeped quite a bit under the stencil and it is partly because the sponge I was using was a bit wet. I then tried with paste with a bettter result.

Now just to clarify : in one of my previous posts I mentioned 2 other stencils that I'd made and from the comments I think some readers thought I actually hand cut the stencils.... Well sadly no, I have nor the patience nor the dexterity to cut so small and intricate stencils. Hand made yes, but I used a punch for one and a die (multiple times) for the other. I made the quatrefoil stencil with several cuts of a die (Memory Box) horizontal strips stuck on top of vertical ones (it works because the design is symetrical). Here's the picture, I haven't cut sticking out pieces because I reckon they will come in handy when I want to pick up the stencil full of paint/paste etc.. and it is for my eyes only, oh and yours...but you will understand !


Thanks for coming by,

Monday, 20 May 2013

In the air challenge

The gauntlet has been thrown at the Impression Obsession blog... "In the air" is the theme and apart from the obvious birds, butterflies etc... what to do??? I use butterflies a lot, as for me they are easier than flowers, being suitable for both male and female cards... but I have butterfly fatigue.

This is what I ended up with, well the houses are "in the air" so I hope it fits the theme, and I love this humorous image. As for the title it started as "house in the air" but then all I could think of was the Eye in the sky tune and there it was...


The image is the Pig Bros. Birdhouse (G1028) by Gary Robertson and I colored it with alcohol markers, you can tell I need some practice !
You may not recognise the banner, it is actually the largest die from the Flags die set (DIE015-F) but it has been partially cut (on one side and then the other), overstamped with CAC Canvas (CC073)

Thanks for coming by,

Thursday, 16 May 2013

Inspired By France Papillon

This week the Paper Artsy blog welcomes France Papillon for some inspiration. I really wanted to make a spool key ring but could I find a suitable spool... I will keep that idea in mind, but in the meantime I had a go at France's journal cover.

This will not be a cover, but a page inside my samples book, so I made a number of adjustments to make it functional. For instance I have flipped the position of the vellum and didn't stitch the top to create a pocket. The string between the brads will also help keeping pieces of paper on the page, a thin elastic would be ideal.
The vellum is an old piece of printed envelope liner, hence the shape, and I used some scraps of handmade paper, yeah using up some old stash !
For the words, I used bits from the Eclectica Lin Brown 3 set, which I won last week - thank you Paper Artsy - as I haven't had time to play with it yet but still HAD to crack it open...

Thanks for coming by,

Sunday, 12 May 2013

In bloom

For this card my first decision was to select a stamp set that came with a magazine which I had not used so far - this is part of my crafting resolutions for this year : use things !!!
I realised quickly that I would need a background and, as I wasn't confident I could colour it with alcohol markers,  I settled on watercolours.


I stamped the clear stamps with Memento London Fog and applied masking fluid before painting the background and over-stamping with some wild grasses stamps inked with markers.
I removed the masking fluid and watercoloured the flowers, using pencils where the brush was too big. I stamped some words as a kind of frame for my miniature painting.
Note: Not sure the whole masking thing was necessary, because against expectations, the Memento ink did not budge at all when I painted over it.


Finally this was my opportunity to place a fence die-cut that so far I haven't used very much, but is entirely appropriate on this occasion, playing with embossing powders mixes to get an aged look.
 
I am entering this card in the Country View Craft's challenge: How does your garden grow ?and the Artistic Stamper's which is all about Words.


Hope you will like this project,

Thursday, 9 May 2013

Inspired By Sue Carrington

Paper Artsy Blog welcomes a new set of designer guests and Sue is the first. I have taken inspiration from her canvas (here) to create a new page for my samples book. Not quite as big as Sue's canvas, plus it needs to lay flat so no embellishments... therefore I had to adapt !

 
Both for the texture paste and stencilled areas I have used home made stencils. Loved to use the "bump" technique ! I became unstuck for stamps (need more texture stamps and some of those Eclectica stamps) and settled for a Newspaper print (Hot pick 1207), a saying (Hot pick 1203) and a Wallpaper print from an old clear stamp set. No treasure gold (as yet) so I used wax crayon to highlight the raised parts.
 
Thanks for coming by,